


Classic Halloween Dirt Cups: Easy to make, this recipe brings back childhood joy! Layer creamy pudding, crushed cookies, & gummy worms for spooky fun.
Honestly, some of my happiest childhood memories are tied to Halloween, and a big chunk of that joy involved these ridiculous, wonderful Classic Halloween Dirt Cups. I remember one year, I was probably seven, and my older brother, bless his heart, tried to make them for a school party. He used sugar-free pudding and, I kid you not, actual dirt from the backyard. It was a disaster, obviously, but the sheer effort and the ensuing chaos are etched in my brain. The kitchen was a mess, we were giggling like maniacs, and even though that batch was inedible, the idea stuck. Now, when I make these, the smell of crushed Oreos and vanilla takes me right back to that messy, laughter-filled kitchen. It’s more than just a dessert, it's a little cup of nostalgia, a sweet, silly tradition.
I remember one time, I was so focused on getting the cream cheese mixture perfectly smooth, I forgot to add the powdered sugar entirely. My husband took a bite, looked at me with this incredibly confused expression, and just said, "Honey, is this... savory?" Oops! We had a good laugh, and I quickly whipped up another batch, making sure to taste as I went. Now, I always do a little finger-dip test before mixing everything, just to avoid any unexpected savory dessert surprises. It’s all part of the fun, right?
Ingredients for Classic Halloween Dirt Cups
Base Ingredients
- Oreo Cookies: Honestly, don't skimp here. You need the classic chocolate sandwich cookie for that authentic "dirt" look and flavor. I've tried generic brands, and they just don't crush the same or have that deep chocolatey goodness.
- Cream Cheese: Full-fat, please! This is what gives your Classic Halloween Dirt Cups that rich, tangy counterpoint to all the sweetness. I tried a low-fat version once, and it just didn't have the same luscious texture, it felt... watery.
- Unsalted Butter: This helps bind the cream cheese mixture and adds a lovely richness. I always melt it gently, not boiling hot, or it can make the mixture a bit too liquidy.
- Powdered Sugar: The key to a smooth, sweet cream cheese layer. Sift it if you're feeling fancy, but honestly, I rarely do and it works out fine, just whisk well!
Creamy Filling
- Whole Milk: Don't use skim milk, just don't. You need the fat for a truly creamy, decadent pudding. I made that mistake once, and the pudding was thin and sad.
- Vanilla Extract: A good quality vanilla makes all the difference. I love a pure vanilla extract, it just elevates the whole flavor profile. I once used imitation, and it had this weird aftertaste, never again!
- Instant Chocolate Pudding Mix: Two small boxes, not the cook-and-serve kind! This is for speed and ease. I always keep a few boxes in my pantry for impromptu dessert emergencies.
- Whipped Topping (like Cool Whip): This is your secret weapon for that light, airy, cloud-like texture. Let it thaw in the fridge, not on the counter, or it can get too runny.
Toppings & Decoration
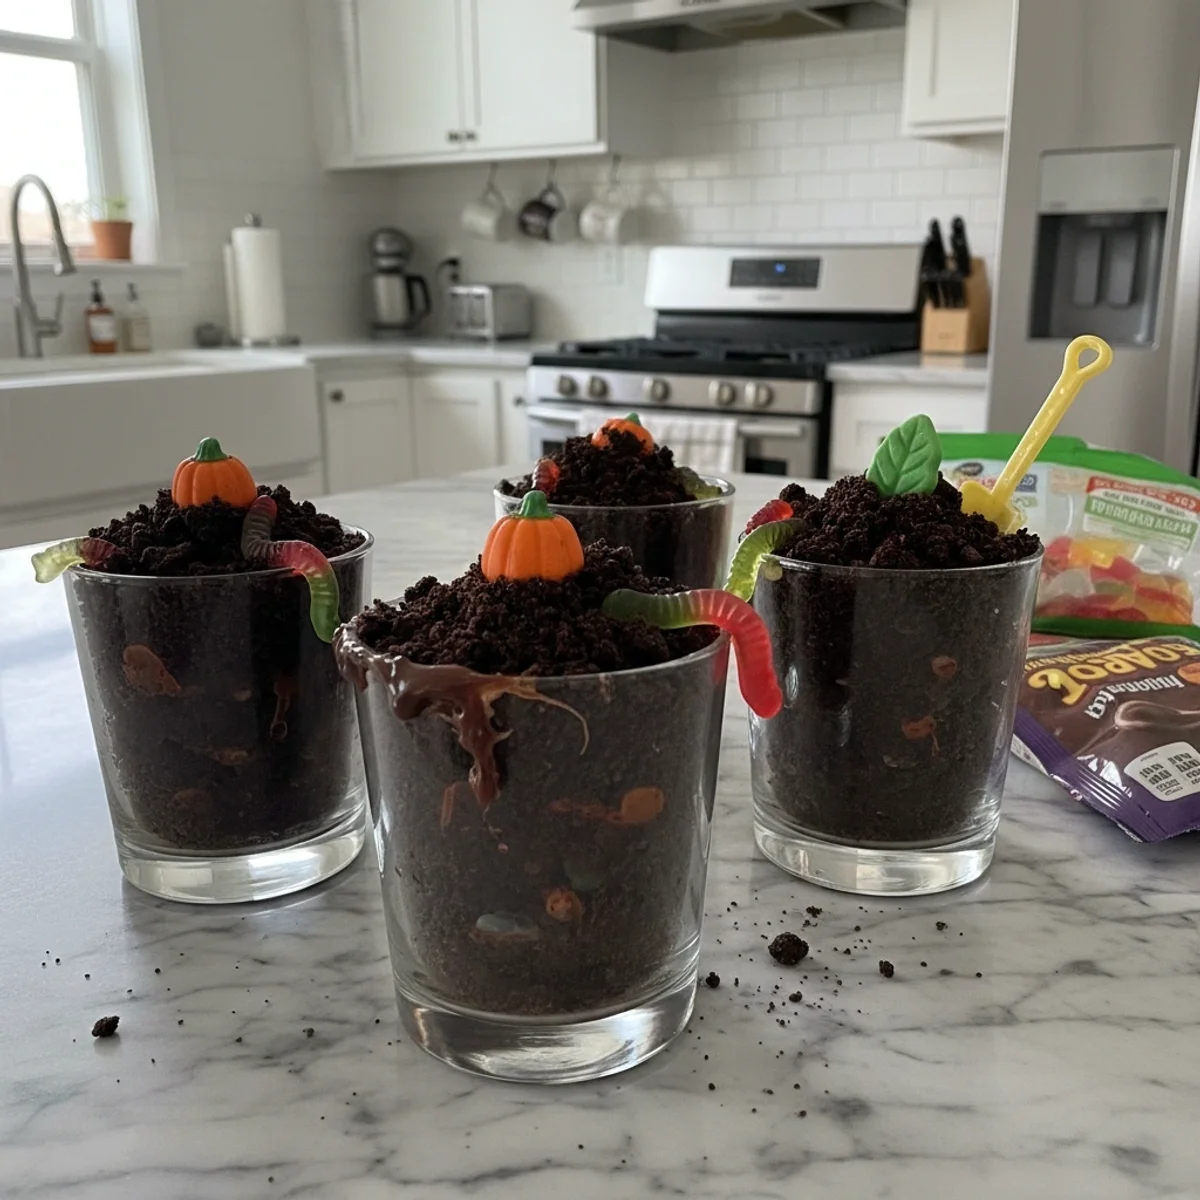
- Gummy Worms: The quintessential dirt cup inhabitant! I usually grab a bag of the multi-colored ones, they just look so much more vibrant peeking out of the "dirt."
- Candy Corn: Totally optional, but I love the pop of orange and yellow for extra Halloween vibes. Plus, a little sweet crunch never hurt anyone.
- Sprinkles: Orange and black sprinkles are fun for an extra festive touch. I always have a stash of seasonal sprinkles, because why not?
Making Your Classic Halloween Dirt Cups
- Crush the "Dirt" (Oreos!):
- Okay, first things first, let's make that dirt! Grab your Oreos and either toss them in a food processor until they're fine crumbs, or, if you're like me and enjoy a bit of stress relief, put them in a zip-top bag and whack them with a rolling pin. I actually prefer the bag method, it feels more hands-on, and honestly, sometimes it's just therapeutic. You want them to look like actual dirt, so no big chunks, alright? Set about a cup of these glorious crumbs aside for later, this is where I always forget to save some!
- Whip Up the Cream Cheese Magic:
- Now for the creamy goodness! In a medium bowl, beat your softened cream cheese and melted butter together until it's super smooth. No lumps allowed here, seriously. Then, gradually add the powdered sugar, beating until it's light and fluffy. This step is crucial for that dreamy texture, so don't rush it! I once added all the sugar at once, and it poofed everywhere. Learn from my oops moment, add it slowly!
- Mix the Pudding Base:
- In a separate, large bowl, whisk together your cold milk, vanilla extract, and both packets of instant chocolate pudding mix. Whisk for a good two minutes until it starts to thicken up. You'll see it transform right before your eyes, getting all glossy and rich. This is where the magic really starts to happen, smelling so chocolatey! Let it sit for a few minutes to set up a bit more, maybe five minutes or so.
- Combine the Creamy Layers:
- Gently fold the cream cheese mixture into the thickened chocolate pudding. You want to be careful here, we're aiming for a smooth, homogenous mixture, not over-beating. After that, fold in about half of your thawed whipped topping. This lightens everything up and makes it incredibly airy and delightful. It should look like a rich, chocolatey cloud!
- Layering Your Spooky Treat:
- Now for the fun part: assembly! Grab your individual cups or a large trifle dish. Start with a layer of your crushed Oreo "dirt" at the bottom. Then, spoon a generous layer of your creamy chocolate mixture over the top. Repeat these layers, finishing with a final thick layer of Oreo crumbs on top. I usually get a little messy here, with crumbs spilling everywhere, but that’s just part of the charm, right?
- Decorate and Chill Your Classic Halloween Dirt Cups:
- Time to bring these Classic Halloween Dirt Cups to life! Stick a few gummy worms into the top layer of "dirt," making them look like they're just wiggling out of the ground. Add some candy corn or festive sprinkles if you like. Pop your finished dirt cups into the fridge for at least an hour to chill. This lets the flavors meld and everything set up nicely. They'll be cold, creamy, and ready for all your spooky season shenanigans!
Honestly, these Classic Halloween Dirt Cups always bring a smile to my face. I remember making a huge batch for a neighborhood potluck last year, and I swear, every kid (and most of the adults!) went straight for them. There was chocolate on faces, gummy worms dangling from mouths, and just pure, unadulterated joy. It's those little moments of shared, simple sweetness that make all the kitchen chaos worth it.
Storing Your Classic Halloween Dirt Cups
So, you've got leftover Classic Halloween Dirt Cups? Lucky you! These store pretty well, actually. Just cover them tightly with plastic wrap or pop them into an airtight container. They'll keep happily in the fridge for about 3-4 days. I've found that the Oreo crumbs on top can get a little soft after a day or two, but honestly, that doesn't bother me one bit, they just meld into the creamy goodness. I once tried to freeze a batch, thinking I was a genius for future dessert emergencies, but the texture of the pudding and whipped topping got a bit weird and grainy when thawed. So, stick to the fridge for these, trust me on that one. They taste best when chilled, so pull them out a few minutes before serving if they've been in there for a while.

Ingredient Substitutions for Classic Halloween Dirt Cups
Okay, let's talk swaps for your Classic Halloween Dirt Cups. If you're not an Oreo fan (gasp!), you could totally use chocolate graham crackers or even chocolate wafer cookies for the "dirt." I tried that once with some chocolate digestive biscuits, and it worked... kinda. The flavor was good, but the texture wasn't quite as fine as the Oreos. For the pudding, vanilla or even white chocolate instant pudding would work if you're not feeling chocolatey, though it won't have the same "dirt" vibe, obviously. If you can't find whipped topping, you could whip up some heavy cream with a bit of powdered sugar and vanilla, but it's a bit heavier. And for the cream cheese? Honestly, I haven't found a good substitute that gives the same tang and richness, so I'd stick with it if you can!
Serving Your Classic Halloween Dirt Cups
These Classic Halloween Dirt Cups are a party in themselves, but they do pair wonderfully with a few things. For a full spooky spread, I love serving them alongside some savory monster-themed finger foods, like mini hot dogs wrapped in crescent roll "mummy" bandages. Drinks-wise, a vibrant green punch or even a simple glass of cold milk complements the sweetness perfectly. And for a grown-up twist, a dark roast coffee or a creamy stout can be surprisingly good with the chocolate. Honestly, these are just begging to be served at a Halloween movie night, maybe with some popcorn on the side. They're also perfect for school parties or just a fun after-dinner treat when you want something a little silly and sweet.
The Backstory of Classic Halloween Dirt Cups
The concept of dirt cups, or more broadly, "dirt cake," isn't some ancient culinary secret, it's a delightful, relatively modern invention born from a love of playful desserts. It really took off in the 80s and 90s, becoming a staple at potlucks, birthday parties, and, you guessed it, Halloween gatherings. The genius lies in its simplicity: taking familiar, comforting ingredients like crushed cookies and creamy pudding, and transforming them into something whimsical and fun. For me, these Classic Halloween Dirt Cups represent that era of carefree, imaginative treats. My mom used to make a version for my birthday every year, and it was always the first thing to disappear. It’s a testament to how food can be more than just sustenance, it can be pure, joyful play. It’s a little bit retro, a little bit silly, and all kinds of delicious.
And there you have it, a batch of Classic Halloween Dirt Cups, ready to bring some spooky cheer! They might not be gourmet, but they're full of heart and silly fun, and sometimes, that's exactly what you need. I hope these bring as much joy and messy memories to your kitchen as they do to mine. Don't forget to share your own dirt cup creations with me, I love seeing how you make them your own!

Frequently Asked Questions About Classic Halloween Dirt Cups
- → Can I make these Classic Halloween Dirt Cups ahead of time?
Oh, absolutely! In fact, I think they're even better when they've had a few hours (or even overnight) in the fridge. It gives all those delicious flavors time to meld together. Just make sure to cover them tightly so they don't pick up any fridge smells, which I've learned the hard way can happen!
- → What if I don't have a food processor for the Oreos?
No worries at all! I often just use a zip-top bag and a rolling pin. It's a bit more effort, but it works perfectly. Just make sure the bag is sealed well, or you'll have chocolate dust everywhere a mistake I've made more than once, honestly!
- → My pudding isn't thickening. What went wrong?
Hmm, usually that means the milk wasn't cold enough, or you didn't whisk it long enough. Make sure to use really cold milk straight from the fridge and whisk vigorously for at least two full minutes. Patience is key here, or you'll get a runny mess, which I've experienced myself!
- → How long do these Classic Halloween Dirt Cups last in the fridge?
They're pretty good for about 3-4 days when covered well. The cookie crumbs might get a little soft, but the creamy layers stay delicious. I wouldn't push it much past that, as the texture can start to change, and nobody wants sad dirt cups!
- → Can I use homemade whipped cream instead of store-bought?
You totally can! Just whip up some heavy cream with a little powdered sugar and vanilla until it forms soft peaks. It will make the cups a bit richer and less airy, but still super tasty. I prefer the convenience of store-bought, but homemade is a lovely touch!
Spooky Classic Halloween Dirt Cups for a Fun Treat
Classic Halloween Dirt Cups: Easy to make, this recipe brings back childhood joy! Layer creamy pudding, crushed cookies, & gummy worms for spooky fun.
Ingredients
Base Ingredients
- 1 (14.3 oz) package Oreo cookies
- 1 (8 oz) package cream cheese, softened
- 1/2 cup (1 stick) unsalted butter, softened
- 1 cup powdered sugar
Creamy Filling
- 3 cups cold whole milk
- 1 teaspoon vanilla extract
- 2 (3.9 oz) packages instant chocolate pudding mix
- 1 (8 oz) container whipped topping (like Cool Whip), thawed
Toppings & Decoration
- 1 (5 oz) bag gummy worms
- Optional: candy corn
- Optional: Halloween sprinkles
Spooky Extras
- Optional: plastic spiders (for garnish, not eating!)
- Optional: chocolate rock candies
Instructions
-
1Crush the "Dirt" (Oreos!):Okay, first things first, let's make that dirt! Grab your Oreos and either toss them in a food processor until they're fine crumbs, or, if you're like me and enjoy a bit of stress relief, put them in a zip-top bag and whack them with a rolling pin. I actually prefer the bag method, it feels more hands-on, and honestly, sometimes it's just therapeutic. You want them to look like actual dirt, so no big chunks, alright? Set about a cup of these glorious crumbs aside for later, this is where I always forget to save some!
-
2Whip Up the Cream Cheese Magic:Now for the creamy goodness! In a medium bowl, beat your softened cream cheese and melted butter together until it's super smooth. No lumps allowed here, seriously. Then, gradually add the powdered sugar, beating until it's light and fluffy. This step is crucial for that dreamy texture, so don't rush it! I once added all the sugar at once, and it poofed everywhere. Learn from my oops moment, add it slowly!
-
3Mix the Pudding Base:In a separate, large bowl, whisk together your cold milk, vanilla extract, and both packets of instant chocolate pudding mix. Whisk for a good two minutes until it starts to thicken up. You'll see it transform right before your eyes, getting all glossy and rich. This is where the magic really starts to happen, smelling so chocolatey! Let it sit for a few minutes to set up a bit more, maybe five minutes or so.
-
4Combine the Creamy Layers:Gently fold the cream cheese mixture into the thickened chocolate pudding. You want to be careful here, we're aiming for a smooth, homogenous mixture, not over-beating. After that, fold in about half of your thawed whipped topping. This lightens everything up and makes it incredibly airy and delightful. It should look like a rich, chocolatey cloud!
-
5Layering Your Spooky Treat:Now for the fun part: assembly! Grab your individual cups or a large trifle dish. Start with a layer of your crushed Oreo "dirt" at the bottom. Then, spoon a generous layer of your creamy chocolate mixture over the top. Repeat these layers, finishing with a final thick layer of Oreo crumbs on top. I usually get a little messy here, with crumbs spilling everywhere, but that’s just part of the charm, right?
-
6Decorate and Chill Your Classic Halloween Dirt Cups:Time to bring these Classic Halloween Dirt Cups to life! Stick a few gummy worms into the top layer of "dirt," making them look like they're just wiggling out of the ground. Add some candy corn or festive sprinkles if you like. Pop your finished dirt cups into the fridge for at least an hour to chill. This lets the flavors meld and everything set up nicely. They'll be cold, creamy, and ready for all your spooky season shenanigans!
Notes
Don't forget to reserve some Oreo crumbs for the top layer; I've rushed before and had to crush more mid-assembly!
Make sure your cream cheese is truly softened, or you'll end up with lumps, and nobody wants lumpy dirt cups.
If you're making these for a crowd, individual clear cups make for super easy serving and a great presentation.
For a dairy-free option, use plant-based cream cheese, dairy-free milk, and vegan whipped topping.
Equipment
Please check ingredients for potential allergens and consult a health professional if in doubt.
Nutrition Facts
It is important to consider this information as approximate and not to use it as definitive health advice.
Comments
Leave a Comment