

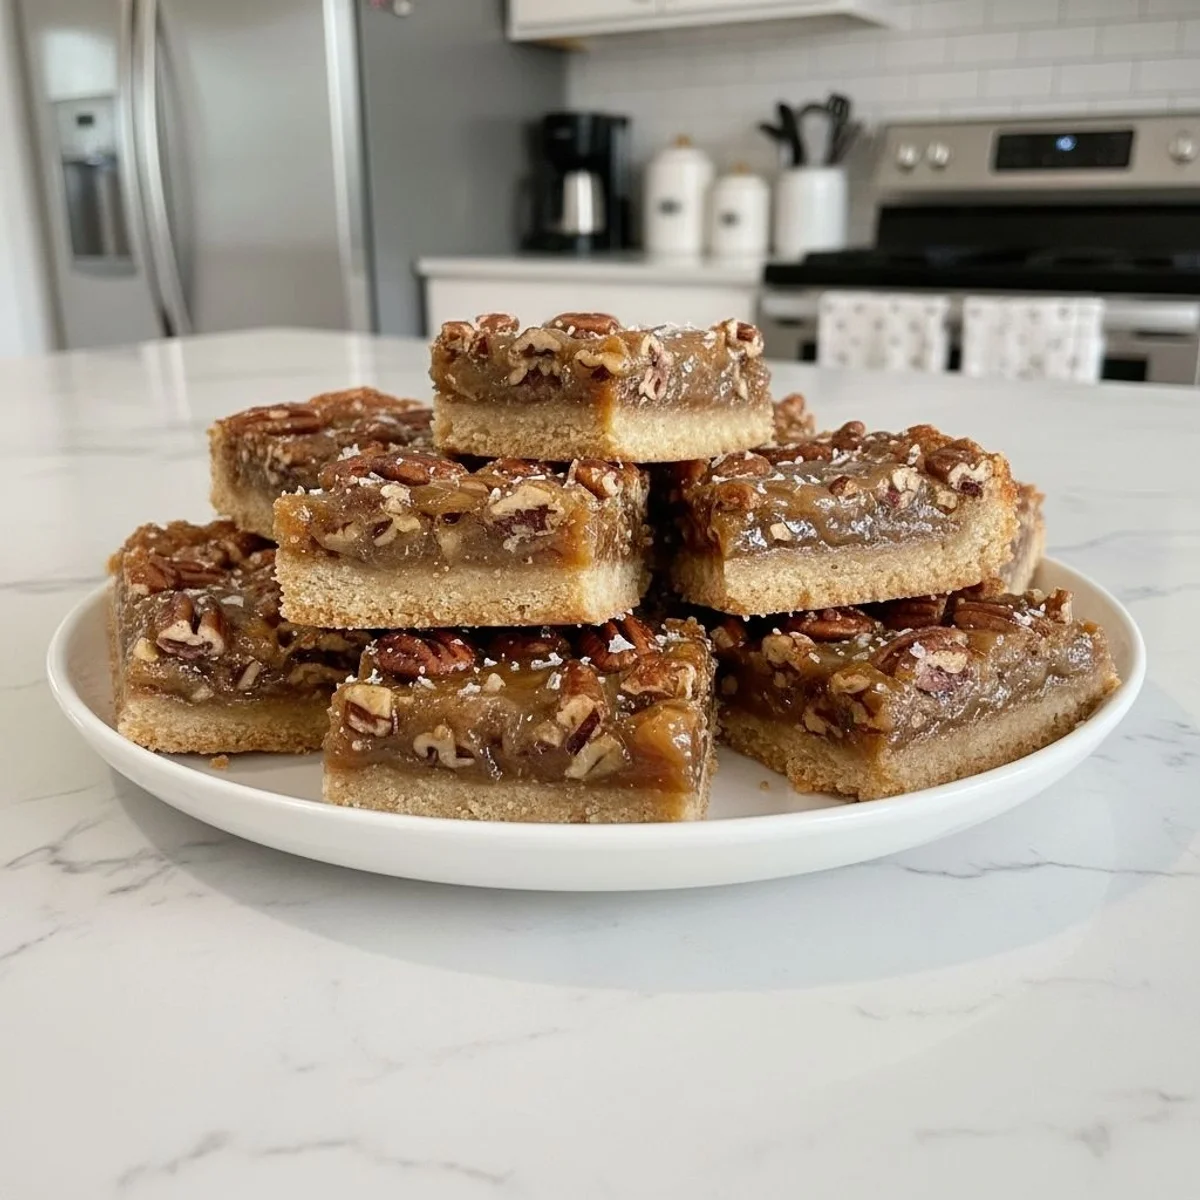
Rich Salted Maple Pecan Pie Bars with Buttery Crust

Bake up delightful Salted Maple Pecan Pie Bars! A buttery shortbread crust topped with a gooey, salty-sweet maple pecan filling. My favorite for any occasion.
I remember the first time I tried to make anything with pecans. It was a disaster, honestly. My grandma, bless her heart, would always make a classic pecan pie for holidays, and it felt like this mythical, unattainable baking feat. Years later, staring at a bag of pecans in my pantry, I decided to tackle a bar version less pressure, right? These Salted Maple Pecan Pie Bars became my kitchen triumph, a sweet and salty hug that brings back all those warm, nostalgic feelings without the pie crust drama. The smell of maple syrup bubbling with pecans? Pure magic.
One time, I got a little too excited with the maple syrup and overfilled the crust. The filling bubbled over in the oven, creating this sticky, caramelized mess on the pan. Oops! It was a pain to clean, but the burnt, crispy bits that scraped off the edges? Honestly, they were a surprisingly delicious, accidental snack. Just goes to show, sometimes kitchen chaos leads to unexpected delights, even with these pecan bars.
Ingredients for Salted Maple Pecan Pie Bars
- All-Purpose Flour: This is the foundation for our buttery shortbread crust. Don't try to use cake flour, it’ll be too delicate and won't hold up to the gooey filling. I once tried a gluten-free blend, and it worked, kinda, but the texture wasn't quite the same.
- Unsalted Butter: Cold butter, cut into cubes, is crucial for that flaky, tender crust. I swear by good quality butter, it makes a huge difference. Don't use margarine, just don't. The flavor won't be as rich, and the crust won't be as crisp.
- Granulated Sugar: Just enough to sweeten the crust without making it overly sweet, letting the maple filling shine. I sometimes cut back a tiny bit if I know my maple syrup is extra sweet.
- Light Brown Sugar: This adds a lovely depth and chewiness to the filling. Dark brown sugar works too, but it can make the filling a bit too robust for my taste. I prefer the subtle caramel notes of light brown.
- Pure Maple Syrup: The star of the show for these bars! Please, for the love of all that's good, use pure maple syrup. The artificial stuff? It just won't give you that rich, nuanced flavor. I always keep a big jug of Grade A amber handy.
- Large Eggs: These bind the filling together, giving it that classic gooey texture. I've tried using only egg yolks for a richer filling, but it can make it a bit too dense. Stick to whole eggs for the best balance.
- Vanilla Extract: A splash of good quality vanilla just elevates all the other flavors. I always add a little extra my secret is to use a vanilla bean paste for an even more intense aroma.
- Pecan Halves: Obviously, you need pecans for pecan pie bars! I like to toast mine lightly before adding them, it really brings out their nutty flavor. Once, I forgot to buy fresh pecans and used some old ones from the back of the pantry, and they tasted... off. Fresh is best!
- Flaky Sea Salt: This is what takes these Salted Maple Pecan Pie Bars from good to absolutely divine. The salt cuts through the sweetness and enhances all the flavors. I sprinkle it generously right before baking, and sometimes a little extra after.
How to Make Salted Maple Pecan Pie Bars
- Prepare the Crust:
- First things first, let's get that crust going! Preheat your oven to 350°F (175°C). Grab a 9x13 inch baking pan and line it with parchment paper, leaving an overhang on the sides. This makes lifting the bars out so much easier, trust me. In a large bowl, whisk together the flour and granulated sugar. Now, cut in the cold butter using a pastry blender or your fingertips until the mixture resembles coarse crumbs. This is where I always get my hands a little messy, but it’s worth it for a tender crust. Press this mixture evenly into the prepared pan. Don't skip chilling the crust later, it prevents shrinking!
- Chill and Bake the Crust:
- Pop that crust into the fridge for about 15-20 minutes. Honestly, this step is non-negotiable for a crisp, sturdy base for your bars. Once chilled, bake it for about 15-20 minutes, or until it's lightly golden around the edges. You want it partially baked so it holds up to the gooey filling without getting soggy. While it's baking, the smell of butter and sugar will start to fill your kitchen pure comfort! Take it out and let it cool a bit while you prepare the filling.
- Whip Up the Maple Pecan Filling:
- In a medium bowl, whisk together the melted unsalted butter, light brown sugar, pure maple syrup, and large eggs until smooth. This is where the magic happens, creating that rich, sweet base. I always make sure everything is well combined, no streaks of egg yolk! Stir in the vanilla extract and those beautiful pecan halves. I often sneak a few extra pecans in here because, well, why not? The aroma of maple and vanilla is just divine at this stage, it makes my kitchen smell incredible!
- Assemble Your Salted Maple Pecan Pie Bars:
- Carefully pour the maple pecan filling over the partially baked crust in your pan. Distribute the pecans evenly, you want every bite of these bars to have a good nut-to-filling ratio. This step always feels a bit like painting a masterpiece, honestly. I try to spread it gently so I don't disturb the crust too much. Make sure the corners are filled too, because nobody wants a sad, empty corner! You'll see the pecans float a bit, which is totally normal.
- Bake to Golden Perfection:
- Return the pan to the oven and bake for another 25-30 minutes, or until the filling is set and golden brown. You'll know it's done when the edges are firm and the center has just a slight jiggle. Don't overbake, or the filling can become too hard. I've definitely made that mistake before, resulting in less gooey bars! Keep an eye on it, every oven is a little different. The whole kitchen will smell like a dream, like a cozy autumn day.
- Cool and Finish:
- Once baked, remove the pan from the oven and immediately sprinkle generously with flaky sea salt. This is a crucial step for the "salted" part of these delicious bars! Let the bars cool completely in the pan on a wire rack. I know, I know, waiting is the hardest part, but cooling is essential for them to set properly. If you cut them too soon, they'll be a gooey mess, trust me on that. Once cool, use the parchment paper overhang to lift them out, slice, and enjoy!
I remember one time I was making these for a potluck and my cat, Mittens, decided to "help" by batting at the cooling pecans on the counter. Total disaster averted, but it added a whole new level of kitchen chaos! Despite the fur-baby interruptions, these Salted Maple Pecan Pie Bars always turn out, and everyone raves about the salty-sweet goodness. It’s a comforting reminder that even with a little mess, good food always wins.
Storing Your Salted Maple Pecan Pie Bars
These Salted Maple Pecan Pie Bars keep pretty well, which is a lifesaver when you make a big batch. Once cooled completely, you can store them in an airtight container at room temperature for up to 3 days. I usually put parchment paper between layers if I stack them, just to prevent any sticking. If you want them to last longer, pop them in the fridge, and they’ll be good for about a week. I tried microwaving a chilled bar once, and the filling got a bit too soft and separated so don't do that lol. They’re honestly best enjoyed at room temp or slightly warmed in a low oven. You can also freeze them! Wrap individual bars tightly in plastic wrap, then place them in a freezer-safe bag or container for up to 3 months. Just thaw at room temperature before serving, they hold up surprisingly well!

Ingredient Swaps for Salted Maple Pecan Pie Bars
I’ve definitely experimented with a few swaps for these Salted Maple Pecan Pie Bars, sometimes out of necessity, sometimes just for fun. If you don't have pecans, walnuts or even a mix of nuts can work, though the flavor profile will shift a bit. I tried a batch with walnuts once, and it was good, kinda, but lacked that distinct pecan richness. For the maple syrup, you can use dark corn syrup if you prefer a more traditional pecan pie flavor, but I really adore the maple notes here. If you're out of brown sugar, you can use all granulated sugar, but add a tiny bit of molasses (about 1 tsp per cup of sugar) to get that depth. I've even tried a tiny pinch of cinnamon in the filling, and it added a nice warmth, but I usually stick to the pure maple pecan flavor. Don't be afraid to play around!
Serving Salted Maple Pecan Pie Bars
These Salted Maple Pecan Pie Bars are fantastic on their own, but a few little touches can make them even more special. A dollop of vanilla bean ice cream melting over a warm bar? Yes please! It’s such a dreamy combination, the cold creaminess against the warm, gooey filling. A swirl of homemade whipped cream with a tiny dash of bourbon also takes them to another level it’s a grown-up treat that makes me feel fancy. For drinks, a strong cup of coffee or a robust black tea pairs beautifully, especially after a big meal. Honestly, sometimes I just grab one with a glass of milk and settle in for a good book. They’re also a hit at holiday gatherings, I’ve brought them to countless potlucks, and they always disappear fast!
The Story Behind Salted Maple Pecan Pie Bars
Pecan pie itself has deep roots in Southern American cuisine, often linked to French settlers in New Orleans who were introduced to pecans by Native Americans. The first recorded pecan pie recipe actually appeared much later, around the late 19th or early 20th century. My own connection to this dessert started with my grandma's holiday table, a tradition I always cherished. While these bars aren't a direct historical recipe, they're my modern take on that classic comfort. Adding maple syrup instead of just corn syrup and that crucial flaky sea salt? That's my personal twist, making them feel both familiar and excitingly new. It’s a recipe that marries tradition with a bit of my own kitchen creativity, turning a beloved classic into something wonderfully unique and utterly delicious.
Honestly, these Salted Maple Pecan Pie Bars have become a staple in my kitchen, a dish that brings smiles and a little bit of sweet relief. There’s something so comforting about that rich, gooey filling balanced with the crisp, buttery crust and that pop of salt. They might seem fancy, but they’re genuinely forgiving, even if you make a few "oops" moments like I do. I hope you give them a try and maybe even add your own little twist! Let me know how your own pecan bars turn out!

Frequently Asked Questions
- → Can I use a different type of nut in these Salted Maple Pecan Pie Bars?
Absolutely! I've tried walnuts, and they work, though the flavor is a bit different. You could even do a mix of nuts if you're feeling adventurous! Just be aware the texture might vary slightly, but it'll still be delicious, promise.
- → What if I don't have pure maple syrup for the Salted Maple Pecan Pie Bars?
While pure maple syrup gives the best flavor, you can use light corn syrup as a substitute for the bulk of it. I'd still try to add a tablespoon or two of real maple for flavor if you can. Avoid pancake syrup, it's just not the same, honestly.
- → Why is chilling the crust important for Salted Maple Pecan Pie Bars?
Oh, I learned this the hard way! Chilling the crust helps prevent it from shrinking too much during baking and keeps it from getting soggy once the filling goes in. It makes for a much sturdier, crispier base, which is crucial for these gooey bars.
- → How long do Salted Maple Pecan Pie Bars last?
In my experience, they're best within 3-4 days at room temperature in an airtight container. If you pop them in the fridge, they'll last about a week. I always have to hide some from myself, honestly, or they're gone in a flash!
- → Can I make these Salted Maple Pecan Pie Bars ahead of time?
Yes, totally! They're actually fantastic for making ahead. You can bake them completely, let them cool, and then store them as advised. Or, you can even freeze them. I love having a batch ready for unexpected guests or a sudden sweet craving.
Rich Salted Maple Pecan Pie Bars with Buttery Crust
Bake up delightful Salted Maple Pecan Pie Bars! A buttery shortbread crust topped with a gooey, salty-sweet maple pecan filling. My favorite for any occasion.
Ingredients
Buttery Crust Essentials
- 1 ½ cups (180g) all-purpose flour
- ½ cup (100g) granulated sugar
- ½ cup (113g) unsalted butter, cold and cubed
Maple Pecan Filling
- ½ cup (113g) unsalted butter, melted
- 1 cup (200g) light brown sugar, packed
- ¾ cup (180ml) pure maple syrup
- 2 large eggs
- 1 teaspoon vanilla extract
- 2 cups (220g) pecan halves
Flavor Enhancers
- 1 teaspoon flaky sea salt, plus more for sprinkling
Instructions
-
1Prepare the Crust:First things first, let's get that crust going! Preheat your oven to 350°F (175°C). Grab a 9x13 inch baking pan and line it with parchment paper, leaving an overhang on the sides. This makes lifting the bars out so much easier, trust me. In a large bowl, whisk together the flour and granulated sugar. Now, cut in the cold butter using a pastry blender or your fingertips until the mixture resembles coarse crumbs. This is where I always get my hands a little messy, but it’s worth it for a tender crust. Press this mixture evenly into the prepared pan. Don't skip chilling the crust later, it prevents shrinking!
-
2Chill and Bake the Crust:Pop that crust into the fridge for about 15-20 minutes. Honestly, this step is non-negotiable for a crisp, sturdy base for your bars. Once chilled, bake it for about 15-20 minutes, or until it's lightly golden around the edges. You want it partially baked so it holds up to the gooey filling without getting soggy. While it's baking, the smell of butter and sugar will start to fill your kitchen – pure comfort! Take it out and let it cool a bit while you prepare the filling.
-
3Whip Up the Maple Pecan Filling:In a medium bowl, whisk together the melted unsalted butter, light brown sugar, pure maple syrup, and large eggs until smooth. This is where the magic happens, creating that rich, sweet base. I always make sure everything is well combined, no streaks of egg yolk! Stir in the vanilla extract and those beautiful pecan halves. I often sneak a few extra pecans in here because, well, why not? The aroma of maple and vanilla is just divine at this stage, it makes my kitchen smell incredible!
-
4Assemble Your Salted Maple Pecan Pie Bars:Carefully pour the maple pecan filling over the partially baked crust in your pan. Distribute the pecans evenly, you want every bite of these bars to have a good nut-to-filling ratio. This step always feels a bit like painting a masterpiece, honestly. I try to spread it gently so I don't disturb the crust too much. Make sure the corners are filled too, because nobody wants a sad, empty corner! You'll see the pecans float a bit, which is totally normal.
-
5Bake to Golden Perfection:Return the pan to the oven and bake for another 25-30 minutes, or until the filling is set and golden brown. You'll know it's done when the edges are firm and the center has just a slight jiggle. Don't overbake, or the filling can become too hard. I've definitely made that mistake before, resulting in less gooey bars! Keep an eye on it, every oven is a little different. The whole kitchen will smell like a dream, like a cozy autumn day.
-
6Cool and Finish:Once baked, remove the pan from the oven and immediately sprinkle generously with flaky sea salt. This is a crucial step for the "salted" part of these delicious bars! Let the bars cool completely in the pan on a wire rack. I know, I know, waiting is the hardest part, but cooling is essential for them to set properly. If you cut them too soon, they'll be a gooey mess, trust me on that. Once cool, use the parchment paper overhang to lift them out, slice, and enjoy!
Notes
Crust chilling is non-negotiable, trust me on this.\nThese bars freeze beautifully, a lifesaver for busy weeks!\nNo dark corn syrup? Maple syrup works, just adjust the sweetness a tad.\nA sprinkle of flaky sea salt right before serving? Game changer.
Equipment
Please check ingredients for potential allergens and consult a health professional if in doubt.
Nutrition Facts
It is important to consider this information as approximate and not to use it as definitive health advice.
Comments
Leave a Comment