

Rich Chocolate Halloween Dessert Cups: A Spooky Treat

Whip up Rich Chocolate Halloween Dessert Cups! These easy, spooky treats are perfect for parties or a cozy night in. Simple, fun, and so tasty.
I remember one blustery October evening, years ago, when I decided to get "creative" for a Halloween potluck. My initial idea involved green slime and gummy eyeballs floating in a punch, which, honestly, looked more like a science experiment gone wrong than a festive drink. But then, a moment of chocolate inspiration struck! I salvaged the evening by whipping up these Chocolate Halloween Dessert Cups. They were a total hit, and my kitchen, despite looking like a cocoa powder explosion, smelled absolutely divine. These cups are special to me because they remind me that even kitchen chaos can lead to something really delightful and comforting.
Oh, the first time I made these Chocolate Halloween Dessert Cups, I thought "whipped cream" meant just beating heavy cream until it looked bubbly. Nope! Ended up with a watery mess that refused to stiffen. I had to ditch it and start over, which felt like a mini-disaster, but hey, we all learn, right? Now, I know the secret is ice-cold cream and not rushing it. It’s those little oops moments that make a recipe uniquely yours, I think.
Ingredients for Chocolate Halloween Dessert Cups
Crust Base
- Oreo Cookie Crumbs: These are the "dirt" for our spooky cups, and honestly, don't use anything else. I tried graham crackers once, and it just didn't have that deep, dark, mysterious Halloween vibe.
- Unsalted Butter, melted: This binds our "dirt" crust together. I once tried shortening because I was out of butter, and it was... greasy. Stick with the butter, trust me.
Creamy Chocolate Filling
- Full-Fat Cream Cheese, softened: You absolutely need the full-fat stuff for that rich, dreamy texture. I didn't expect the difference to be so huge, but reduced-fat just makes it watery and sad.
- Powdered Sugar: For sweetness and a silky-smooth filling. Sift it if you're feeling fancy, otherwise, just make sure to beat out any lumps. My first time, I skipped sifting and had little sugar bumps, oops!
- Pure Vanilla Extract: A splash of the good stuff makes all the difference. None of that imitation vanilla, please! It adds a warmth that just hits different.
- Unsweetened Cocoa Powder: This is where the deep chocolate flavor comes from. Use a good quality one, it really shines. I remember buying a cheap one once, and the cups tasted... flat. Never again!
- Heavy Cream, very cold: This is what makes our filling light and fluffy. Make sure it's super cold, like straight from the back of the fridge. I've had many a whipping fail when my cream wasn't cold enough.
- Chocolate Syrup (or melted semi-sweet chocolate): For an extra boost of chocolatey goodness. I've used both, and they both work, but melted chocolate gives it a slightly richer, more intense flavor.
Spooky Toppings
- Whipped Cream (store-bought or homemade): A fluffy cloud on top! I love making my own, but sometimes, a can of whipped cream is just easier, and that's okay!
- Halloween Sprinkles: The more colorful, the better! These instantly scream "party time!"
- Candy Eyeballs: These are non-negotiable for spooky Chocolate Halloween Dessert Cups! They just bring so much personality. I always grab extra because some inevitably "disappear" before decorating.
- Gummy Worms or Gummy Candies: For that "creepy crawly" effect. My kids love adding these, and honestly, so do I. It's the little things, right?
Crafting Your Chocolate Halloween Dessert Cups
- Crush and Press the Base:
- Okay, first up, grab those Oreos and crush them into fine crumbs. I usually just toss them in a food processor, but a Ziploc bag and a rolling pin work too a great way to get out some stress, honestly! Then, melt your butter and mix it into the crumbs until it looks like wet sand. Press about 2 tablespoons of this mix firmly into the bottom of each serving cup. This is where I always make a bit of a mess, getting crumbs everywhere, but it’s part of the fun, I guess! Pop these cups into the fridge while you get the filling ready.
- Whip the Cream Cheese Mixture:
- Next, in a large bowl, beat the softened cream cheese until it's super smooth and fluffy, no lumps allowed! Then, gradually add the powdered sugar and vanilla extract, beating until everything is well combined and creamy. I always taste it here, just a little, to make sure it's sweet enough for my liking. Don't overmix, though, or it can get too thin, and we don't want that for our Chocolate Halloween Dessert Cups!
- Fold in the Chocolate and Cream:
- In a separate, very cold bowl, whip your heavy cream until it forms stiff peaks. This is where patience pays off! Once whipped, gently fold about half of the whipped cream into your cream cheese mixture. Then, fold in the cocoa powder and chocolate syrup (or melted chocolate). Once that's all combined, gently fold in the remaining whipped cream until everything is just barely mixed. You want it light and airy, not deflated!
- Assemble Your Chocolate Halloween Dessert Cups:
- Now for the fun part! Spoon or pipe the chocolate cream cheese filling over your chilled Oreo crusts in the cups. Fill them almost to the top, leaving a little room for our spooky decorations. I usually just use a spoon, but if you're feeling fancy, a piping bag makes it look super neat. Smooth out the tops, or leave them a little rustic honestly, it's Halloween, anything goes! Pop these back into the fridge for at least 30 minutes, or even better, an hour or two.
- Decorate for Spooky Fun:
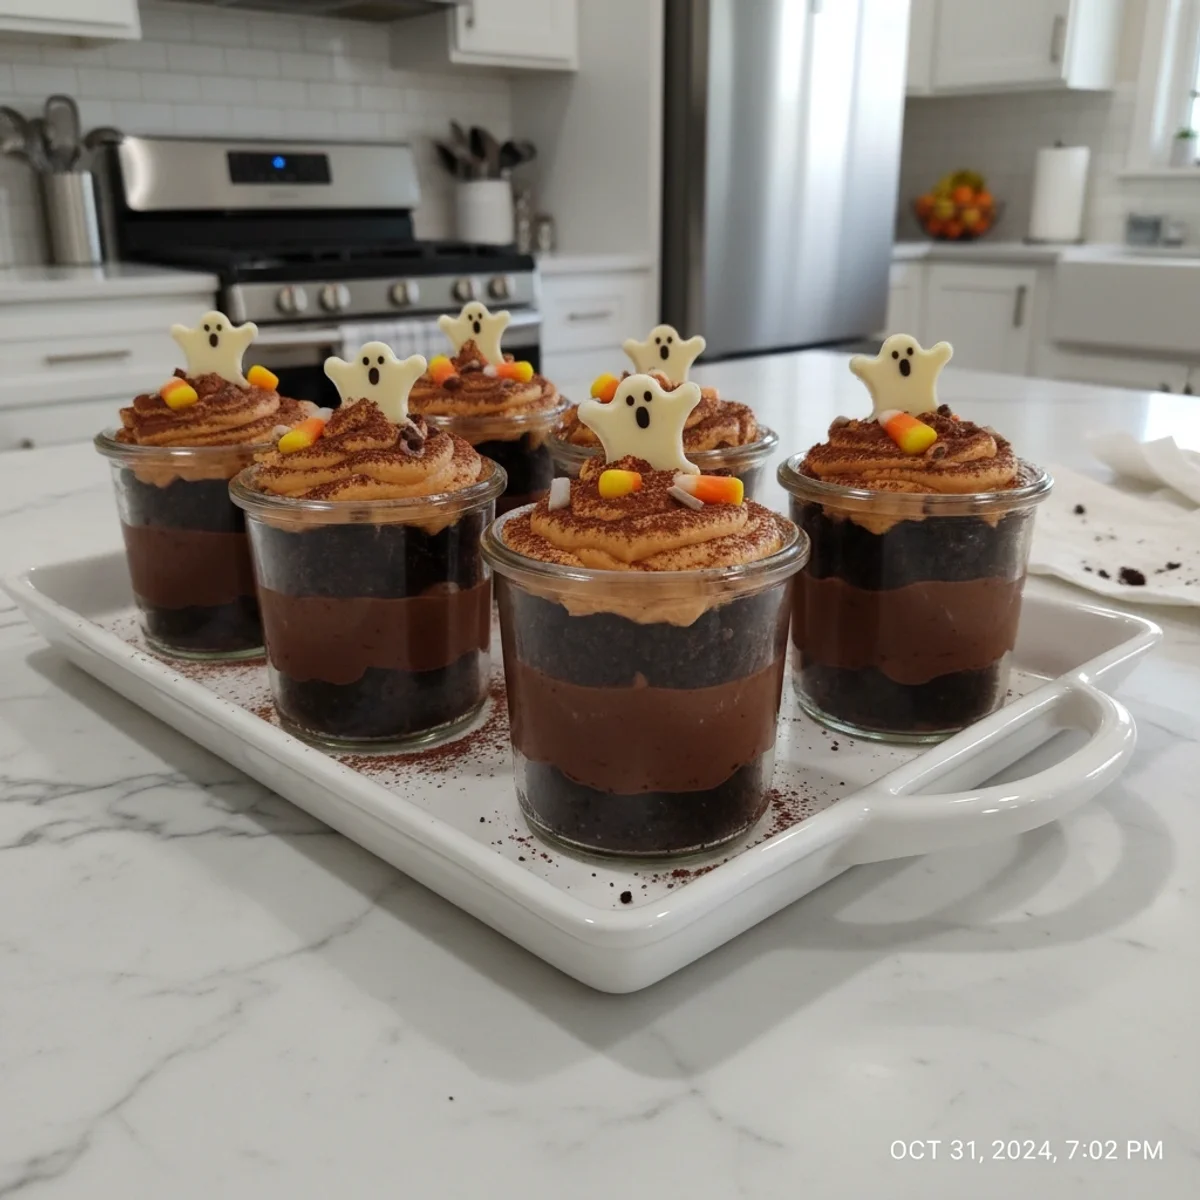
- Once your Chocolate Halloween Dessert Cups are nicely chilled and set, it's time to get creative! Top each cup with a generous dollop of whipped cream. This is where my kitchen usually descends into delightful chaos with sprinkles flying! Add your Halloween sprinkles, those adorable candy eyeballs, and let some gummy worms peek out from the whipped cream. You can also sprinkle a few extra Oreo crumbs on top for a "freshly dug grave" look. My kids love this part, and honestly, so do I.
- Chill and Serve Your Spooky Treats:
- After decorating, it's a good idea to pop your Chocolate Halloween Dessert Cups back into the fridge for another 15-30 minutes. This lets the toppings settle a bit and ensures everything is perfectly chilled for serving. The final result should be a layered treat with a firm crust, a rich, airy chocolate filling, and a fun, spooky top. They smell like pure chocolatey joy, and taste even better! Dig in and enjoy your delicious, spooky creation!
There's something so satisfying about seeing these little Chocolate Halloween Dessert Cups lined up, all ready for a party. I remember one year, my little nephew tried to eat a gummy worm that was still half-buried in the whipped cream, and it pulled the whole thing off! We all just laughed, scooped it back up, and he still devoured it. It's those messy, happy kitchen moments that make recipes like this so much more than just food.
Storing Your Chocolate Halloween Dessert Cups
Okay, so you've made a batch of these glorious Chocolate Halloween Dessert Cups, and maybe you have some leftovers (though, honestly, that rarely happens in my house!). You can totally store them in the fridge. Just make sure they're covered tightly with plastic wrap or in an airtight container to keep them fresh. I once left some uncovered, and the whipped cream got all sad and crusty so don't do that lol. They'll keep well for about 3-4 days. The Oreo crust might soften a little over time, but the chocolate filling stays just as dreamy. I wouldn't recommend freezing them, as the texture of the cream cheese filling and whipped cream can get a bit weird and watery when thawed. Best enjoyed fresh, or within a few days from the fridge!

Ingredient Substitutions for Chocolate Halloween Dessert Cups
I've played around with these Chocolate Halloween Dessert Cups quite a bit, so I have a few swap ideas for you! If you're not an Oreo fan, you could use crushed chocolate chip cookies or even graham cracker crumbs for the base I tried graham crackers once, and it worked, kinda, but it wasn't as dark and spooky. For the chocolate filling, if you don't have cocoa powder, you could melt down about 4 oz of semi-sweet chocolate chips and fold that in instead. I've also swapped out vanilla extract for a little peppermint extract during the holidays, which was a fun twist! For a dairy-free version, I've had decent luck with dairy-free cream cheese and coconut cream (chilled, then whipped), but the texture is a little different, just a heads-up. Experimentation is always encouraged in my kitchen!
Chocolate Halloween Dessert Cups: Serving Fun
These Chocolate Halloween Dessert Cups are basically a party in a cup, and they're so versatile for serving! Of course, they're the star of any Halloween gathering, whether it's a kid's costume party or an adult spooky movie night. I love serving them alongside a big bowl of popcorn for movie marathons it's that perfect sweet and salty combo. For a more "grown-up" vibe, a small glass of a rich, dark coffee or even a splash of Kahlúa in the filling (for adults only, of course!) can elevate them. They're also fantastic for a cozy night in, curled up with a good book or a cheesy horror flick. Honestly, they're so satisfying, they don't need much else, but a little extra drizzle of chocolate syrup never hurt anyone, right?
The Sweet Story of Chocolate Halloween Dessert Cups
While these Chocolate Halloween Dessert Cups don't have centuries of history, their spirit is deeply rooted in modern Halloween traditions that blend of spooky fun and sweet indulgence. For me, they represent the joy of creating something special for those we love, especially during holidays. My grandma always made a big deal out of Halloween, even if it was just decorating the house with cobwebs and making simple treats. These cups kind of carry on that feeling taking something simple and making it magical. They're about creating new memories, sharing a laugh over a gummy worm, and just enjoying that fleeting, fun, slightly spooky time of year. It’s a recipe born from a desire to make people smile, and that, to me, is a beautiful cultural connection.
Honestly, these Chocolate Halloween Dessert Cups always bring a huge smile to faces, even mine after a hectic day in the kitchen. They're a reminder that sometimes the simplest, messiest recipes are the most rewarding. Watching everyone enjoy them, especially the kids with their candy-eye-studded creations, makes all the cocoa powder explosions worth it. I hope you give them a whirl and make some lovely, slightly chaotic, memories of your own!

Frequently Asked Questions
- → Can I make Chocolate Halloween Dessert Cups ahead of time?
Yes, absolutely! You can assemble the cups with the crust and filling a day or two in advance. Just hold off on adding the whipped cream and spooky toppings until right before serving so they stay fresh and don't get soggy. I do this all the time!
- → What if my heavy cream won't whip for these dessert cups?
Oh, I've been there! The trick is to make sure your heavy cream is super, super cold. Pop your mixing bowl and whisk attachment in the freezer for 10-15 minutes before you start. It really helps the cream stiffen up quickly. Don't give up!
- → Can I use a different type of chocolate for the filling?
You sure can! I've used melted milk chocolate for a sweeter, milder flavor, and even dark chocolate for a more intense, grown-up version of these Chocolate Halloween Dessert Cups. Just adjust the powdered sugar to your taste. Experiment and see what you love!
- → How long do Chocolate Halloween Dessert Cups last in the fridge?
These dessert cups will stay delicious for about 3-4 days in the refrigerator, as long as they're well covered. The Oreo crust might get a little softer over time, but the chocolate filling usually holds up beautifully. Just remember to cover them!
- → Any tips for making these dessert cups kid-friendly to decorate?
Definitely! Lay out all the sprinkles, candy eyes, and gummy worms in separate bowls. Let the kids go wild! It might get a little messy, but that's part of the fun. I always let my little ones create their own spooky masterpieces.
Rich Chocolate Halloween Dessert Cups: A Spooky Treat
Whip up Rich Chocolate Halloween Dessert Cups! These easy, spooky treats are perfect for parties or a cozy night in. Simple, fun, and so tasty.
Ingredients
Crust Base
- 20 Oreo Cookie Crumbs (about 1.5 cups)
- 4 tbsp Unsalted Butter, melted
Creamy Chocolate Filling
- 8 oz Full-Fat Cream Cheese, softened
- 1 cup Powdered Sugar
- 1 tsp Pure Vanilla Extract
- 1/2 cup Unsweetened Cocoa Powder
- 1 cup Heavy Cream, very cold
- 2 tbsp Chocolate Syrup (or 2 oz melted semi-sweet chocolate)
Spooky Toppings
- 1 cup Whipped Cream (store-bought or homemade)
- 2 tbsp Halloween Sprinkles
- 16 Candy Eyeballs
- 8 Gummy Worms or Gummy Candies
Instructions
-
1Crush and Press the Base:Okay, first up, grab those Oreos and crush them into fine crumbs. I usually just toss them in a food processor, but a Ziploc bag and a rolling pin work too – a great way to get out some stress, honestly! Then, melt your butter and mix it into the crumbs until it looks like wet sand. Press about 2 tablespoons of this mix firmly into the bottom of each serving cup. This is where I always make a bit of a mess, getting crumbs everywhere, but it’s part of the fun, I guess! Pop these cups into the fridge while you get the filling ready.
-
2Whip the Cream Cheese Mixture:Next, in a large bowl, beat the softened cream cheese until it's super smooth and fluffy, no lumps allowed! Then, gradually add the powdered sugar and vanilla extract, beating until everything is well combined and creamy. I always taste it here, just a little, to make sure it's sweet enough for my liking. Don't overmix, though, or it can get too thin, and we don't want that for our Chocolate Halloween Dessert Cups!
-
3Fold in the Chocolate and Cream:In a separate, very cold bowl, whip your heavy cream until it forms stiff peaks. This is where patience pays off! Once whipped, gently fold about half of the whipped cream into your cream cheese mixture. Then, fold in the cocoa powder and chocolate syrup (or melted chocolate). Once that's all combined, gently fold in the remaining whipped cream until everything is just barely mixed. You want it light and airy, not deflated!
-
4Assemble Your Chocolate Halloween Dessert Cups:Now for the fun part! Spoon or pipe the chocolate cream cheese filling over your chilled Oreo crusts in the cups. Fill them almost to the top, leaving a little room for our spooky decorations. I usually just use a spoon, but if you're feeling fancy, a piping bag makes it look super neat. Smooth out the tops, or leave them a little rustic – honestly, it's Halloween, anything goes! Pop these back into the fridge for at least 30 minutes, or even better, an hour or two.
-
5Decorate for Spooky Fun:Once your Chocolate Halloween Dessert Cups are nicely chilled and set, it's time to get creative! Top each cup with a generous dollop of whipped cream. This is where my kitchen usually descends into delightful chaos with sprinkles flying! Add your Halloween sprinkles, those adorable candy eyeballs, and let some gummy worms peek out from the whipped cream. You can also sprinkle a few extra Oreo crumbs on top for a "freshly dug grave" look. My kids love this part, and honestly, so do I.
-
6Chill and Serve Your Spooky Treats:After decorating, it's a good idea to pop your Chocolate Halloween Dessert Cups back into the fridge for another 15-30 minutes. This lets the toppings settle a bit and ensures everything is perfectly chilled for serving. The final result should be a layered treat with a firm crust, a rich, airy chocolate filling, and a fun, spooky top. They smell like pure chocolatey joy, and taste even better! Dig in and enjoy your delicious, spooky creation!
Notes
Always use very cold heavy cream for whipping; it makes all the difference, I learned that the hard way.
Don't overmix the cream cheese mixture once you add the powdered sugar, or it can get too thin.
Chilling time is your friend! These Chocolate Halloween Dessert Cups need time to set up properly.
For extra spooky flair, add a layer of raspberry jam (thinned with a tiny bit of water) between the crust and the chocolate filling for a "bloody" surprise.
Equipment
Please check ingredients for potential allergens and consult a health professional if in doubt.
Nutrition Facts
It is important to consider this information as approximate and not to use it as definitive health advice.
Comments
Leave a Comment