

Quick Korean Ground Beef Bowl: Your New Weeknight Dinner

Korean Ground Beef Bowl: Make this easy, savory dinner a family favorite tonight! Quick to prepare for busy weeknights.
You know those nights, right? The ones where the clock is ticking, everyone’s asking “What’s for dinner?”, and your brain just… blanks. That used to be me, almost every Tuesday. Then, a few years back, my friend Min-ji introduced me to the concept of a Korean Ground Beef Bowl. I was skeptical, honestly. Ground beef? Korean? But she insisted it was an easy dinner, a game-changer. I remember trying it for the first time, the aroma of garlic and sesame filling my tiny kitchen it was like a warm hug, but in food form. This dish quickly became my trusty weeknight savior, a delicious escape from decision fatigue.
The first time I made this Korean Ground Beef Bowl on my own, I completely forgot the brown sugar. I mean, how do you forget the sweet in a sweet and savory dish? It was… an experience. My husband politely said it was "interesting," which, let's be real, is code for "what is this?" I added a spoonful of maple syrup at the table just to salvage it. Oops! Lesson learned: don’t skip the sugar, it balances everything beautifully.
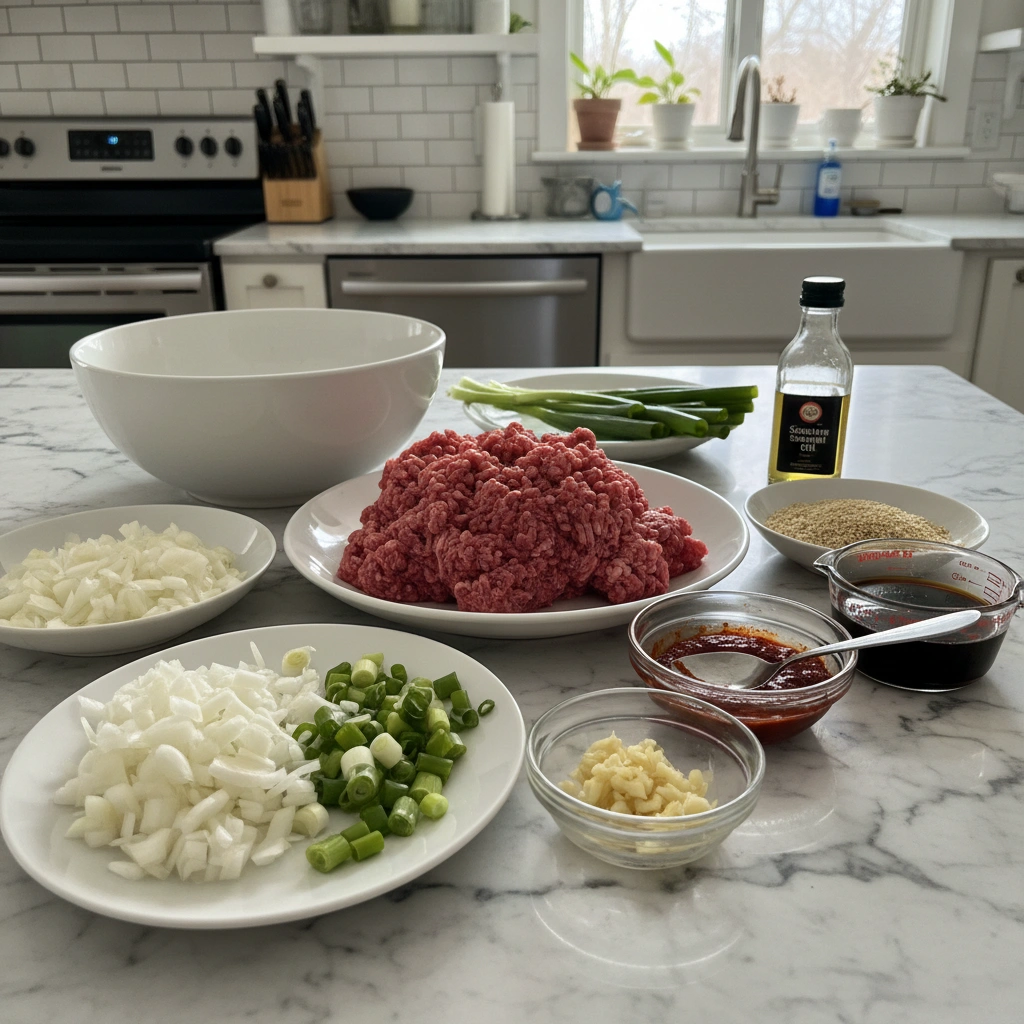
Ingredients for Your Korean Ground Beef Bowl
- Lean Ground Beef (85/15 or 90/10): This is the star of our Korean Ground Beef Bowl! I always go for leaner, because nobody wants a greasy bowl, right? It just browns better and feels lighter.
- Cooked White Rice: A fluffy bed for all that deliciousness. Honestly, I often use leftover rice from takeout night, or those microwaveable pouches when I'm really in a pinch. Don't judge, it works!
- Soy Sauce (low sodium): The salty, umami backbone. I swear by Kikkoman low sodium, it gives you all the flavor without feeling like you drank the ocean. I tried a super cheap brand once, and it just wasn't the same.
- Brown Sugar (light or dark): This is crucial for that signature sweet-savory balance. Remember my "oops" moment? Don't skip it! It caramelizes beautifully with the beef.
- Toasted Sesame Oil: Oh, the aroma! This is non-negotiable for that authentic Korean flavor. A little goes a long way, but it makes such a difference. Don't use regular sesame oil, it's not the same.
- Fresh Ginger (grated): Bright, zingy, and fresh. I always keep a knob in the freezer it grates like a dream when frozen, no peeling needed! Fresh over dried, always, for this dish.
- Garlic (minced): Can you ever have too much garlic? I think not. I usually double the amount called for, it just adds so much depth to our Korean Ground Beef Bowl.
- Rice Vinegar: A touch of acidity to cut through the richness and brighten everything up. It's like a secret weapon for balancing flavors.
- Gochujang (Korean chili paste): For a little kick! If you're sensitive to spice, start with a tiny bit. I tried a different chili paste once and it just tasted... wrong. This one's special.
- Green Onions (chopped): For color, freshness, and a mild oniony bite. I love sprinkling these generously at the end.
- Sesame Seeds (toasted): A pretty garnish and a lovely nutty crunch. They just make everything look more intentional.
Making Your Korean Ground Beef Bowl
- Brown the Beef:
- Alright, first things first! Grab a large skillet my trusty cast iron always gets the job done and set it over medium-high heat. Add your lean ground beef, breaking it up with a spoon as it cooks. You want it nicely browned all over, no pink bits left. This is where all that lovely savory base for your Korean Ground Beef Bowl starts. I usually let it get a little crispy on the edges, honestly, it adds so much flavor!
- Drain & Add Aromatics:
- Once the beef is browned, drain off any excess fat. Don't skip this, nobody wants a greasy mess! Return the skillet to the heat, and now's the time for those amazing aromatics. Toss in your minced garlic and grated ginger. Oh, the smell that hits you! Sauté them for about a minute, until they're fragrant. Be careful not to burn the garlic, that’s a mistake I made once and it ruined the whole batch. Keep stirring!
- Whisk the Sauce:
- While your aromatics are doing their thing, grab a small bowl. Whisk together the soy sauce, brown sugar, toasted sesame oil, rice vinegar, and gochujang. Give it a good whisk until the sugar mostly dissolves. This sauce is the magic that brings our Korean Ground Beef Bowl to life! Taste it does it need more sweet? More heat? This is your kitchen, your rules!
- Combine & Simmer:
- Pour that glorious sauce right over your browned beef, garlic, and ginger in the skillet. Stir it all together, making sure every bit of beef is coated. Bring it to a gentle simmer and let it cook for about 5-7 minutes, stirring occasionally. You want the sauce to thicken slightly and really cling to the beef. This is where the flavors deepen and meld, making your kitchen smell incredible!
- Prep Your Bowls:
- While the beef simmers, get your bowls ready. Spoon a generous amount of that warm, fluffy white rice into each. This is the foundation for your delicious Korean Ground Beef Bowl. I like to make a little well in the center for the beef, but honestly, just pile it on! No need for fancy plating when you're hungry.
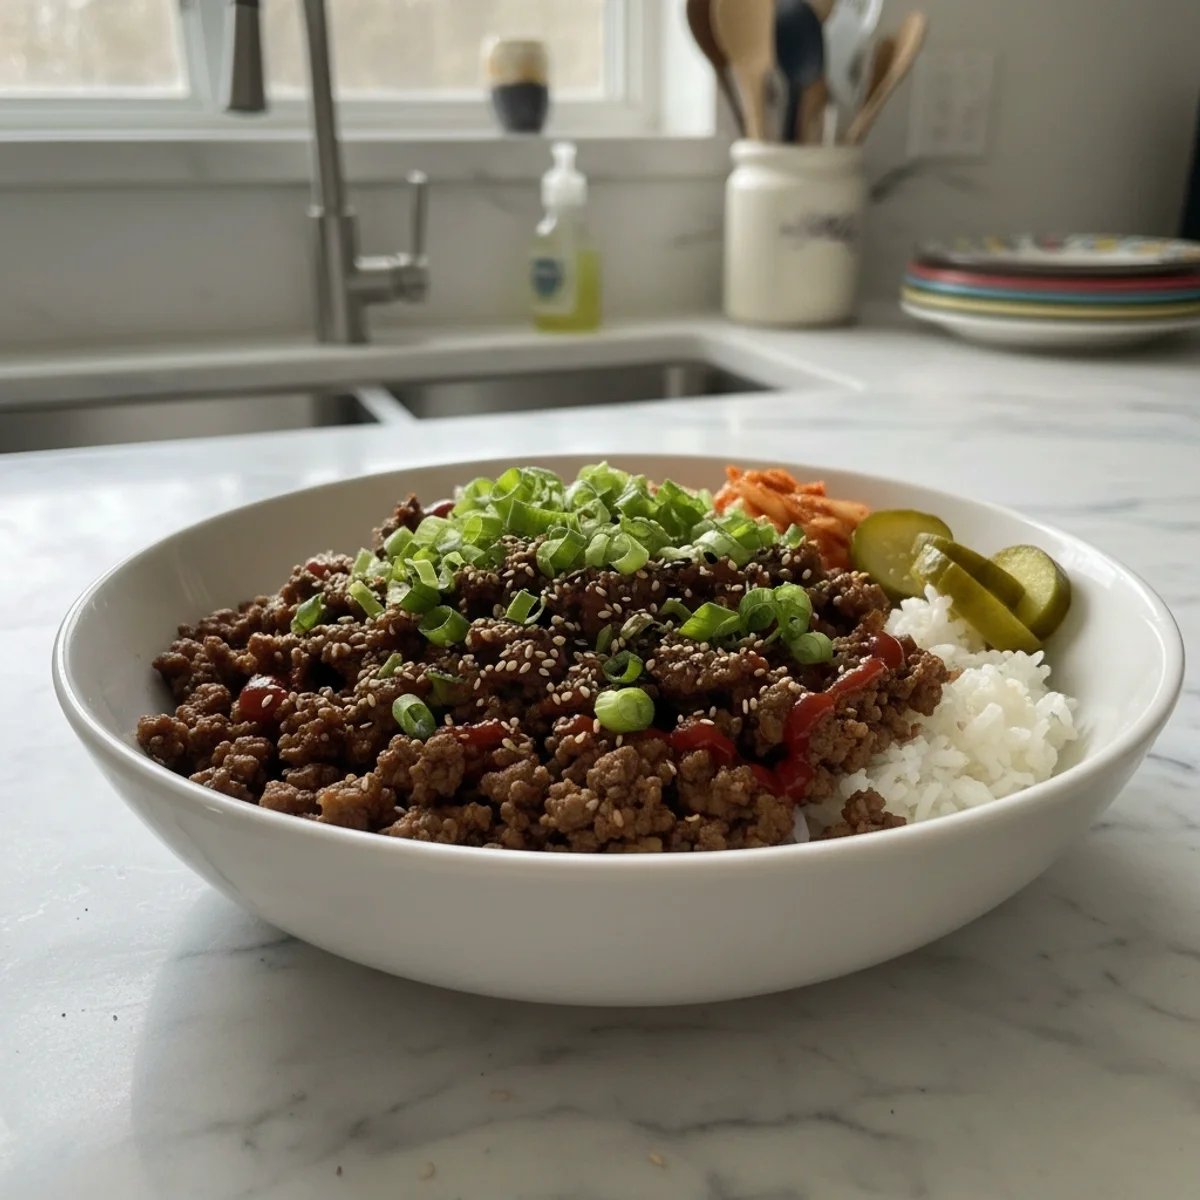
- Garnish & Serve:
- Once the beef is saucy and fragrant, spoon it generously over the rice in your bowls. Now for the fun part garnish! Sprinkle generously with chopped green onions and toasted sesame seeds. If you're feeling extra, a fried egg on top is a game-changer, or a dollop of kimchi. Stand back and admire your handiwork! It’s ready to devour, hot and savory.
There was one chaotic evening, mid-week, when I was trying to make this Korean Ground Beef Bowl after a particularly rough day. My toddler was "helping" by pulling all the pots out of the cupboard, and the dog decided it was prime time for zoomies. Despite the mayhem, the simplicity of this dish meant I still got a delicious, comforting dinner on the table. It’s a testament to how forgiving and genuinely easy this recipe is, even when your kitchen feels like a circus.
Storing Your Korean Ground Beef Bowl
This Korean Ground Beef Bowl is fantastic for meal prep, honestly! Once cooled completely, store the beef mixture and the rice separately in airtight containers in the fridge. I've found the beef keeps really well for up to 3-4 days. The rice, too, but I always make sure it’s completely cool before lidding, to avoid any weird condensation. I tried reheating the beef and rice together once in the microwave, and the rice got a bit mushy and the sauce separated a little so don't do that lol! It's much better to reheat the beef gently on the stovetop or in the microwave separately, then spoon it over freshly warmed rice. This way, everything stays perfectly textured and flavorful for your next easy dinner.

Korean Ground Beef Bowl Ingredient Swaps
Life happens, and sometimes you just don't have everything on hand, right? For the ground beef, ground turkey or even finely crumbled firm tofu can totally work, I tried turkey once, and it was a lighter take on the Korean Ground Beef Bowl that was surprisingly good. If you don't have fresh ginger, a good quality ground ginger (about 1/2 teaspoon per tablespoon of fresh) can pinch-hit, though the fresh really makes it sing. No brown sugar? Maple syrup or honey can offer a similar sweetness, just start with less and taste as you go. And if gochujang is too spicy or unavailable, a dash of sriracha or even a tiny bit of red pepper flakes can add some heat, though it won't have that specific fermented depth. Experiment! That's what cooking is all about.
Serving Your Korean Ground Beef Bowl
This Korean Ground Beef Bowl is a complete meal on its own, but sometimes I like to jazz it up! For a fresh crunch, a side of quick pickled cucumbers or a simple green salad with a sesame vinaigrette is lovely. If you’re feeling extra, a sunny-side-up fried egg on top is my absolute favorite the runny yolk just creates a whole new sauce, yum! Kimchi is a must for me, the fermented spice really complements the savory beef. As for drinks, a crisp, cold lager or even just some sparkling water with a squeeze of lime really hits the spot. This dish and a good documentary on a Friday night? Yes please!
The Story Behind This Korean Ground Beef Bowl
While this particular "bowl" format is a modern, often Americanized interpretation, its flavors are deeply rooted in traditional Korean cuisine. It draws inspiration from dishes like Bulgogi, a classic marinated grilled beef, and various banchan (side dishes) that feature similar savory, sweet, and spicy notes. My connection to this recipe started with Min-ji, whose family shared their love for Korean food with me. Learning about the balance of flavors the salty soy, sweet sugar, pungent garlic, and spicy gochujang opened up a whole new world in my kitchen. It's a testament to how traditional flavors can be adapted into a quick, easy dinner that still feels authentic and incredibly satisfying, bringing a little piece of Korean culinary warmth right into my home.
Honestly, this Korean Ground Beef Bowl has saved so many of my weeknights. It’s more than just a recipe, it’s a reminder that even on the busiest days, a truly delicious and comforting meal is totally within reach. The way the savory beef, fluffy rice, and fresh garnishes come together just makes my heart happy. I hope it brings a little bit of that same kitchen magic to your table, too. Try it out, tweak it, make it your own, and tell me how your version turns out!
 Pin it
FAQs About This Korean Ground Beef Bowl
- → Can I make this Korean Ground Beef Bowl spicier?
Absolutely! If you love heat, feel free to add more gochujang to the sauce. You could also sprinkle some red pepper flakes over your finished bowl. I've even added a dash of sriracha directly to my portion for an extra kick!
- → What if I don't have brown sugar?
No worries! You can substitute brown sugar with honey or maple syrup. Start with a little less than the recipe calls for, as liquid sweeteners can be more potent, and taste the sauce before adding it to your Korean Ground Beef Bowl.
- → How do I prevent my ground beef from being greasy?
Using lean ground beef helps immensely, but the key is to fully drain any rendered fat after browning. I usually tilt the pan and use a spoon to scoop out the excess. This keeps your Korean Ground Beef Bowl light and flavorful.
- → Can I freeze leftover Korean Ground Beef Bowl?
Yes, you can! The cooked beef mixture freezes really well in an airtight container for up to 2-3 months. Just thaw it in the fridge overnight and reheat gently. I don't usually freeze the rice with it, as rice can get a bit weird after freezing and thawing.
- → What other vegetables could I add to this Korean Ground Beef Bowl?
Oh, so many options! Sautéed bell peppers, shredded carrots, or even some spinach wilted into the beef mixture at the end would be delicious. I sometimes add a handful of frozen peas for extra color and a bit of sweetness to my Korean Ground Beef Bowl.
Quick Korean Ground Beef Bowl: Your New Weeknight Dinner
Korean Ground Beef Bowl: Make this easy, savory dinner a family favorite tonight! Quick to prepare for busy weeknights.
Ingredients
Base Ingredients
- 1 lb lean ground beef (85/15 or 90/10)
- 4 cups cooked white rice
Flavor Foundation
- 1/2 cup low sodium soy sauce (or tamari for GF)
- 1/4 cup packed light brown sugar
- 1 tbsp toasted sesame oil
- 2 tbsp fresh ginger, grated
- 4 cloves garlic, minced
- 1 tbsp rice vinegar
- 1-2 tbsp gochujang (Korean chili paste), to taste
Freshness & Finish
- 4 green onions, chopped
- 1 tbsp sesame seeds, toasted
Instructions
-
1Brown the Beef:Alright, first things first! Grab a large skillet – my trusty cast iron always gets the job done – and set it over medium-high heat. Add your lean ground beef, breaking it up with a spoon as it cooks. You want it nicely browned all over, no pink bits left. This is where all that lovely savory base for your Korean Ground Beef Bowl starts. I usually let it get a little crispy on the edges, honestly, it adds so much flavor!
-
2Drain & Add Aromatics:Once the beef is browned, drain off any excess fat. Don't skip this, nobody wants a greasy mess! Return the skillet to the heat, and now's the time for those amazing aromatics. Toss in your minced garlic and grated ginger. Oh, the smell that hits you! Sauté them for about a minute, until they're fragrant. Be careful not to burn the garlic, that’s a mistake I made once and it ruined the whole batch. Keep stirring!
-
3Whisk the Sauce:While your aromatics are doing their thing, grab a small bowl. Whisk together the soy sauce, brown sugar, toasted sesame oil, rice vinegar, and gochujang. Give it a good whisk until the sugar mostly dissolves. This sauce is the magic that brings our Korean Ground Beef Bowl to life! Taste it – does it need more sweet? More heat? This is your kitchen, your rules!
-
4Combine & Simmer:Pour that glorious sauce right over your browned beef, garlic, and ginger in the skillet. Stir it all together, making sure every bit of beef is coated. Bring it to a gentle simmer and let it cook for about 5-7 minutes, stirring occasionally. You want the sauce to thicken slightly and really cling to the beef. This is where the flavors deepen and meld, making your kitchen smell incredible!
-
5Prep Your Bowls:While the beef simmers, get your bowls ready. Spoon a generous amount of that warm, fluffy white rice into each. This is the foundation for your delicious Korean Ground Beef Bowl. I like to make a little well in the center for the beef, but honestly, just pile it on! No need for fancy plating when you're hungry.
-
6Garnish & Serve:Once the beef is saucy and fragrant, spoon it generously over the rice in your bowls. Now for the fun part – garnish! Sprinkle generously with chopped green onions and toasted sesame seeds. If you're feeling extra, a fried egg on top is a game-changer, or a dollop of kimchi. Stand back and admire your handiwork! It’s ready to devour, hot and savory.
Notes
Always use fresh ginger and garlic for the best flavor; dried just doesn't hit the same, trust me.
For meal prep, store the beef and rice separately to maintain texture when reheating.
If you don't have gochujang, sriracha can work in a pinch for heat, but the flavor profile will be a little different.
A fried egg on top with a runny yolk is an absolute game-changer for this dish, don't skip it!
Equipment
Please check ingredients for potential allergens and consult a health professional if in doubt.
Nutrition Facts
It is important to consider this information as approximate and not to use it as definitive health advice.
Comments
Leave a Comment