


Master a Juicy Spatchcock Turkey Recipe for Thanksgiving! Get crispy skin, even cooking, and a tender bird with my easy, personal method.
Oh, Thanksgiving. For years, it was a battle. A wrestling match with a giant bird that always, always, came out with dry breast and raw thighs. My kitchen was a battlefield, hon, gravy splatters everywhere, and me, sweating over a thermometer, muttering under my breath. Then, a few years back, my cousin Leo (he's a bit of a kitchen tinkerer) mentioned "spatchcocking." I thought he was making it up, honestly. But the idea of a flatter bird, cooking more evenly? It sounded like a dream. The first time I tried this Juicy Spatchcock Turkey Recipe, I was nervous, clippers in hand, but the result? A tender, juicy turkey with crispy skin, and a much calmer me. It’s a game-changer for holiday meals, truly.
I remember the first time I attempted this holiday bird. I was so intent on cutting out the backbone, I accidentally snipped a tiny bit of my apron. Oops! My husband just chuckled from the doorway, "Looks like the turkey fought back, Mama Tessa!" But, you know, even with a little snip and a moment of panic, the process was way less intimidating than I thought. And the smell that filled the house as it roasted? Pure holiday magic, I tell ya.
Ingredients for a Juicy Spatchcock Turkey
Main Turkey & Brine
- Whole Turkey (12-14 lbs): This is our star, obviously! A smaller bird works best for spatchcocking, as it fits better in your roasting pan. I usually grab one that's already thawed, unless I'm feeling ambitious with a frozen one.
- Kosher Salt: For that essential dry brine. Don't skip this step, honestly. It's the secret weapon for a truly moist and flavorful bird. I tried it without once, and the turkey was just... fine. We want more than fine!
- Black Peppercorns: Freshly cracked, if you can. It adds a lovely subtle heat to the brine. I always think about grinding it myself, but sometimes the pre-ground stuff works, too, I won't lie.
- Bay Leaves: A few of these tucked into the brine give such a warm, almost woodsy aroma. It just smells like Thanksgiving, doesn't it?
Herb Butter & Seasoning
- Unsalted Butter (1 stick, softened): We're slathering this under and over the skin. Unsalted is key so you can control the salt content yourself. I once used salted and, well, it was a bit much. Live and learn!
- Fresh Sage, Rosemary, Thyme: These are the classic holiday herbs, and for good reason! They just scream "Thanksgiving dinner." Chop them finely, you want them to distribute evenly in that glorious butter.
- Garlic (4-5 cloves, minced): More garlic is always better, in my humble opinion. It adds so much depth. I've been known to throw in an extra clove or two when no one's looking. Shhh!
- Smoked Paprika: This gives a beautiful color and a hint of smoky flavor without needing a smoker. I didn't expect it to make such a difference, but it really does!
Aromatics for Roasting
- Yellow Onion (1, quartered): These go under the turkey in the pan, adding moisture and flavor to the drippings for gravy.
- Carrots (2, roughly chopped): Just like the onion, they contribute to a delicious pan sauce.
- Celery Stalks (2, roughly chopped): The trifecta of roasting vegetables! They make your kitchen smell amazing as the turkey cooks.
Finishing Touches
- Chicken Broth (1 cup): Poured into the bottom of the roasting pan to keep things moist and give you a head start on that gravy.
Instructions for Your Juicy Spatchcock Turkey
- Prep the Bird for Spatchcocking:
- First things first, get that turkey out of its packaging and pat it super, super dry with paper towels. Honestly, this is a crucial step for crispy skin, don't skip it! Lay it breast-side down on a big cutting board. Now, grab those sturdy kitchen shears this is where the fun begins, kinda. You’re going to cut along both sides of the backbone, from the tail all the way up to the neck. It takes a bit of muscle, especially through the rib bones, but keep going! You'll hear some satisfying snaps. Once the backbone is removed, flip the turkey over. You want to press down firmly on the breastbone until you hear a crack. This flattens the bird, making it perfect for your holiday feast. I always feel like a pro butcher when I do this, even though I'm usually just making a mess.
- Dry Brine the Turkey:
- Next, we're giving our bird a dry brine. In a small bowl, mix together your kosher salt and black peppercorns. Rub this mixture all over the turkey, making sure to get it under the skin of the breast and thighs. Don't be shy, really get in there! Place the turkey on a wire rack set inside a rimmed baking sheet. Tuck a few bay leaves under the skin or in the cavity area. Pop it uncovered into the fridge for at least 12 hours, or even up to 24 hours. This step, while requiring some patience, makes a huge difference in how juicy and flavorful your finished turkey turns out. I've tried rushing it, and believe me, it’s not the same.
- Whip Up the Herb Butter:
- About an hour before you're ready to roast, take your turkey out of the fridge to let it come closer to room temperature. While it's chilling, get your herb butter ready. In a small bowl, combine the softened unsalted butter with your finely chopped fresh sage, rosemary, and thyme. Add the minced garlic and smoked paprika. Mash it all together with a fork until it’s beautifully mixed. It should smell absolutely divine, like all the best parts of autumn rolled into one! This aromatic butter is going to give our Juicy Spatchcock Turkey Recipe so much flavor and that gorgeous golden-brown skin we all crave. I always manage to get a bit of butter on my nose during this step, honestly.
- Season and Roast:
- Now for the fun part! Gently separate the skin from the breast and thigh meat, being careful not to tear it. Take about half of your herb butter mixture and spread it evenly under the skin. Then, slather the remaining butter all over the outside of the turkey. Arrange your chopped onion, carrots, and celery in the bottom of a large roasting pan. Place the spatchcocked turkey on top of these aromatics, breast-side up. Pour the chicken broth into the bottom of the pan around the vegetables, not over the turkey. This adds moisture and helps create those delicious pan drippings for gravy. Pop it into a preheated oven (I usually set mine to 425°F or 220°C). This high heat blast is key to getting that initial crispy skin on your holiday bird. It’s gonna smell amazing really quick!
- Monitor and Finish Roasting:
- After about 20-30 minutes at the high temperature, reduce your oven heat to 350°F (175°C). Continue roasting, basting every 30 minutes or so with the pan drippings, if you remember. I sometimes forget, and it still turns out fine, but basting does help with browning. Keep an eye on the skin, if it's browning too quickly, you can loosely tent it with foil. The total cooking time for a 12-14 lb bird is usually around 90-120 minutes. The most important thing here is to use a meat thermometer! Insert it into the thickest part of the thigh, avoiding the bone. You're looking for an internal temperature of 165°F (74°C). This is where you know your Juicy Spatchcock Turkey is cooked through and safe to eat. Don't pull it out too early, hon!
- Rest and Carve:
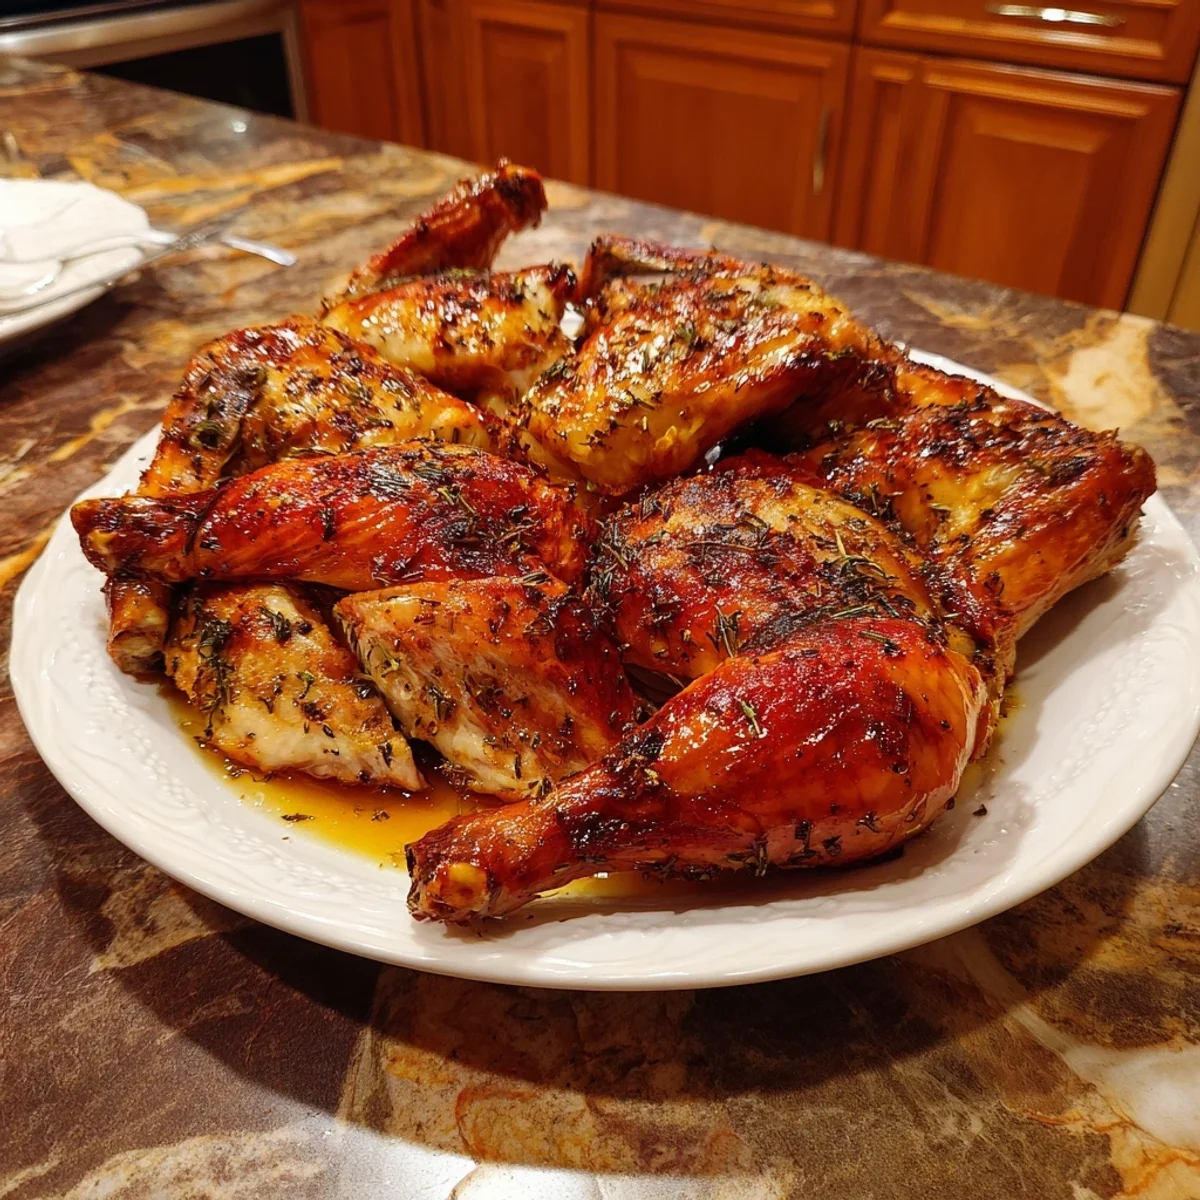
- Once your turkey hits that glorious 165°F, carefully remove it from the oven. Transfer the turkey from the roasting pan to a large cutting board. This is a critical step, honestly! Loosely tent it with foil and let it rest for at least 20-30 minutes. I know, it's hard to wait when your kitchen smells this good, but resting allows the juices to redistribute throughout the meat, ensuring every bite of your holiday turkey is tender and moist. If you carve it too soon, all those precious juices will just run out onto the board. After resting, carve it up and get ready for the compliments! It should be beautifully golden, with skin that crunches just right.
I remember one Thanksgiving, I was so proud of my perfectly browned turkey, I completely forgot about the gravy until five minutes before dinner. Talk about kitchen chaos! But even with that little hiccup, the turkey still shone through. It's forgiving, truly, and seeing everyone's faces light up when they bite into that tender meat and crispy skin? That's what makes all the effort worth it for me.
Storage Tips for Your Juicy Spatchcock Turkey Recipe
Leftovers from this Juicy Spatchcock Turkey Recipe are a treasure, honestly! Once the turkey has cooled completely, carve any remaining meat off the bones. I usually separate the white and dark meat, then store them in airtight containers. You can keep it in the fridge for 3-4 days. I learned the hard way that trying to store a whole, partially carved bird just makes a mess and dries it out faster. For reheating, gently warm slices in a pan with a splash of broth to keep them moist I microwaved it once without broth and it turned out a bit rubbery, so don't do that lol. You can also freeze cooked turkey meat for up to 2-3 months. Just make sure it’s completely cooled and well-wrapped to prevent freezer burn. It's great for soups, sandwiches, or even a quick turkey pot pie later!

Ingredient Substitutions for Juicy Spatchcock Turkey Recipe
Life happens, and sometimes you don't have exactly what the recipe calls for. For the herbs, feel free to swap out fresh for dried, but use about a third of the amount since dried herbs are more concentrated. I tried using all dried once, and it worked, kinda, but the fresh herbs give such a vibrant flavor. If you don't have smoked paprika, regular paprika is fine, but you'll miss that subtle smoky depth. No chicken broth? Vegetable broth works perfectly, or even just water in a pinch, though the broth adds more flavor to your drippings. If you're out of bay leaves, it's not the end of the world, but they do add a nice background note to this Juicy Spatchcock Turkey Recipe. Get creative with your aromatics too, apples or lemons sliced in the pan add another layer of flavor. It's your kitchen, hon, make it yours!
Serving Suggestions for Juicy Spatchcock Turkey Recipe
This Juicy Spatchcock Turkey Recipe is the star of any holiday table, but it loves a good supporting cast! I always pair it with my creamy mashed potatoes (extra butter, obviously), a vibrant green bean casserole, and my mama's famous cranberry sauce that tartness really cuts through the richness of the turkey. For a drink, a crisp hard cider or a light-bodied Pinot Noir would be lovely. And for dessert? Something comforting like an apple pie or pumpkin cheesecake. Honestly, this dish and a good holiday movie, maybe a cozy blanket? Yes please! It’s not just a meal, it’s an experience, a memory in the making. Make sure to use those pan drippings for a killer gravy, too!
Cultural Backstory of Spatchcocking for a Juicy Spatchcock Turkey Recipe
While spatchcocking (or butterflying, as some call it) might feel like a new kitchen trend, it's actually been around for ages! The technique itself is just about flattening a bird to help it cook more evenly and quickly. It's a smart, practical method used in various cuisines to get that beautiful crispy skin and tender meat. For me, discovering this technique for my holiday turkey transformed my Thanksgiving experience. It took the stress out of the main event and let me focus on what truly matters: gathering around the table with loved ones. It’s a simple trick, but one that brings so much joy, especially when you're aiming for a perfectly cooked Juicy Spatchcock Turkey Recipe that everyone will rave about.
So there you have it, my secret to a stress-free and truly delicious holiday bird. This Juicy Spatchcock Turkey Recipe has rescued many a Thanksgiving in my house, turning kitchen chaos into culinary triumph. I just love how golden and inviting it looks when it comes out of the oven, smelling of herbs and happy memories. I really hope you give it a try and make it your own. Let me know how your bird turns out, and what special touches you add!

Frequently Asked Questions
- → Can I use a larger turkey for this Juicy Spatchcock Turkey Recipe?
You can, but a bird around 12-14 lbs is honestly ideal for spatchcocking. Larger turkeys can be tougher to flatten and might not fit as well in a standard roasting pan. Plus, they take longer to cook, so adjust your times accordingly.
- → What if I don't have kitchen shears for spatchcocking?
A very sharp, heavy-duty chef's knife can work, but it's much harder and honestly a bit riskier. I once tried it with a dull knife and it was a mess! I really recommend investing in good kitchen shears for this method.
- → My turkey skin isn't getting crispy, what went wrong?
Ah, that's usually because the skin wasn't dry enough to start, or the initial oven temp wasn't high enough. Remember to pat it super dry and don't skip that first blast of high heat! Also, make sure it’s not tented with foil for too long.
- → How do I store leftover turkey meat?
Once cooled, carve the meat off the bones and store it in airtight containers in the fridge for up to 3-4 days. For longer storage, freeze it in portions. Don't leave it out too long, food safety first, hon!
- → Can I add other seasonings to my spatchcock turkey?
Absolutely! I've experimented with a little lemon zest in the herb butter, or a pinch of cayenne for a subtle kick. It's your kitchen, play around with flavors you love! Just don't go too wild on your first try.
Juicy Spatchcock Turkey Recipe for Holiday Dinner
Master a Juicy Spatchcock Turkey Recipe for Thanksgiving! Get crispy skin, even cooking, and a tender bird with my easy, personal method.
Ingredients
Main Turkey & Brine
- Whole Turkey (12-14 lbs)
- Kosher Salt
- Black Peppercorns
- Bay Leaves
Herb Butter & Seasoning
- Unsalted Butter (1 stick, softened)
- Fresh Sage, Rosemary, Thyme (chopped)
- Garlic (4-5 cloves, minced)
- Smoked Paprika
Aromatics for Roasting
- Yellow Onion (1, quartered)
- Carrots (2, roughly chopped)
- Celery Stalks (2, roughly chopped)
Finishing Touches
- Chicken Broth (1 cup)
Instructions
-
1Prep the Bird for Spatchcocking:First things first, get that turkey out of its packaging and pat it super, super dry with paper towels. Honestly, this is a crucial step for crispy skin, don't skip it! Lay it breast-side down on a big cutting board. Now, grab those sturdy kitchen shears – this is where the fun begins, kinda. You’re going to cut along both sides of the backbone, from the tail all the way up to the neck. It takes a bit of muscle, especially through the rib bones, but keep going! You'll hear some satisfying snaps. Once the backbone is removed, flip the turkey over. You want to press down firmly on the breastbone until you hear a crack. This flattens the bird, making it perfect for your holiday feast. I always feel like a pro butcher when I do this, even though I'm usually just making a mess.
-
2Dry Brine the Turkey:Next, we're giving our bird a dry brine. In a small bowl, mix together your kosher salt and black peppercorns. Rub this mixture all over the turkey, making sure to get it under the skin of the breast and thighs. Don't be shy, really get in there! Place the turkey on a wire rack set inside a rimmed baking sheet. Tuck a few bay leaves under the skin or in the cavity area. Pop it uncovered into the fridge for at least 12 hours, or even up to 24 hours. This step, while requiring some patience, makes a huge difference in how juicy and flavorful your finished turkey turns out. I've tried rushing it, and believe me, it’s not the same.
-
3Whip Up the Herb Butter:About an hour before you're ready to roast, take your turkey out of the fridge to let it come closer to room temperature. While it's chilling, get your herb butter ready. In a small bowl, combine the softened unsalted butter with your finely chopped fresh sage, rosemary, and thyme. Add the minced garlic and smoked paprika. Mash it all together with a fork until it’s beautifully mixed. It should smell absolutely divine, like all the best parts of autumn rolled into one! This aromatic butter is going to give our Juicy Spatchcock Turkey Recipe so much flavor and that gorgeous golden-brown skin we all crave. I always manage to get a bit of butter on my nose during this step, honestly.
-
4Season and Roast:Now for the fun part! Gently separate the skin from the breast and thigh meat, being careful not to tear it. Take about half of your herb butter mixture and spread it evenly under the skin. Then, slather the remaining butter all over the outside of the turkey. Arrange your chopped onion, carrots, and celery in the bottom of a large roasting pan. Place the spatchcocked turkey on top of these aromatics, breast-side up. Pour the chicken broth into the bottom of the pan around the vegetables, not over the turkey. This adds moisture and helps create those delicious pan drippings for gravy. Pop it into a preheated oven (I usually set mine to 425°F or 220°C). This high heat blast is key to getting that initial crispy skin on your holiday bird. It’s gonna smell amazing really quick!
-
5Monitor and Finish Roasting:After about 20-30 minutes at the high temperature, reduce your oven heat to 350°F (175°C). Continue roasting, basting every 30 minutes or so with the pan drippings, if you remember. I sometimes forget, and it still turns out fine, but basting does help with browning. Keep an eye on the skin, if it's browning too quickly, you can loosely tent it with foil. The total cooking time for a 12-14 lb bird is usually around 90-120 minutes. The most important thing here is to use a meat thermometer! Insert it into the thickest part of the thigh, avoiding the bone. You're looking for an internal temperature of 165°F (74°C). This is where you know your Juicy Spatchcock Turkey is cooked through and safe to eat. Don't pull it out too early, hon!
-
6Rest and Carve:Once your turkey hits that glorious 165°F, carefully remove it from the oven. Transfer the turkey from the roasting pan to a large cutting board. This is a critical step, honestly! Loosely tent it with foil and let it rest for at least 20-30 minutes. I know, it's hard to wait when your kitchen smells this good, but resting allows the juices to redistribute throughout the meat, ensuring every bite of your holiday turkey is tender and moist. If you carve it too soon, all those precious juices will just run out onto the board. After resting, carve it up and get ready for the compliments! It should be beautifully golden, with skin that crunches just right.
Comments
Leave a Comment