

Easy No-Bake Halloween Dessert: Spooky Spiderweb Treats

Easy No-Bake Halloween Dessert! Create spooky spiderweb treats in minutes. Simple, quick, and fun for all ages. Enjoy a delicious, no-stress Halloween!
Remember that one Halloween when I swore I’d make everything from scratch? Yeah, me neither. My kitchen looked like a glitter-bomb exploded, and I was still stirring pumpkin soup at midnight. Honestly, sometimes you just need a win, especially when the little ghouls and goblins are about to descend! That’s where this Easy No-Bake Halloween Dessert comes into play. It’s my saving grace, a simple magic trick that makes everyone happy without me losing my mind. No oven, no fuss, just pure spooky fun. This dish matters because it lets me actually enjoy the holiday instead of just cooking through it!
I remember the first time I tried making a spiderweb design on these. I thought, 'Oh, I'll just use a spoon!' Big mistake. It looked more like a blob monster had sneezed on my dessert than a delicate web. My kid, bless her heart, asked if it was a 'chocolate alien.' Oops! But hey, that's how we learn, right? Now I know the trick, and I’m sharing all my little secrets so your Easy No-Bake Halloween Dessert looks perfectly eerie, not alien-y. It’s all about the controlled drizzle, hon.
Easy No-Bake Halloween Dessert Ingredients
Creamy Base
- Instant Chocolate Pudding Mix (large box): This is the backbone of our Easy No-Bake Halloween Dessert. Honestly, don't skimp on the 'instant' part unless you want to spend an hour stirring. I usually go for a good quality brand, it really makes a difference in texture.
- Whole Milk: For that rich, creamy texture. Don't use skim milk, just don't. I tried it once, and it tasted like sad, watery chocolate. Stick to whole milk for a luxurious pudding that holds up well.
- Whipped Topping (like Cool Whip): This adds lightness and a cloud-like consistency. It's so much easier than whipping your own cream, especially when you're in a hurry.
Crunchy Elements
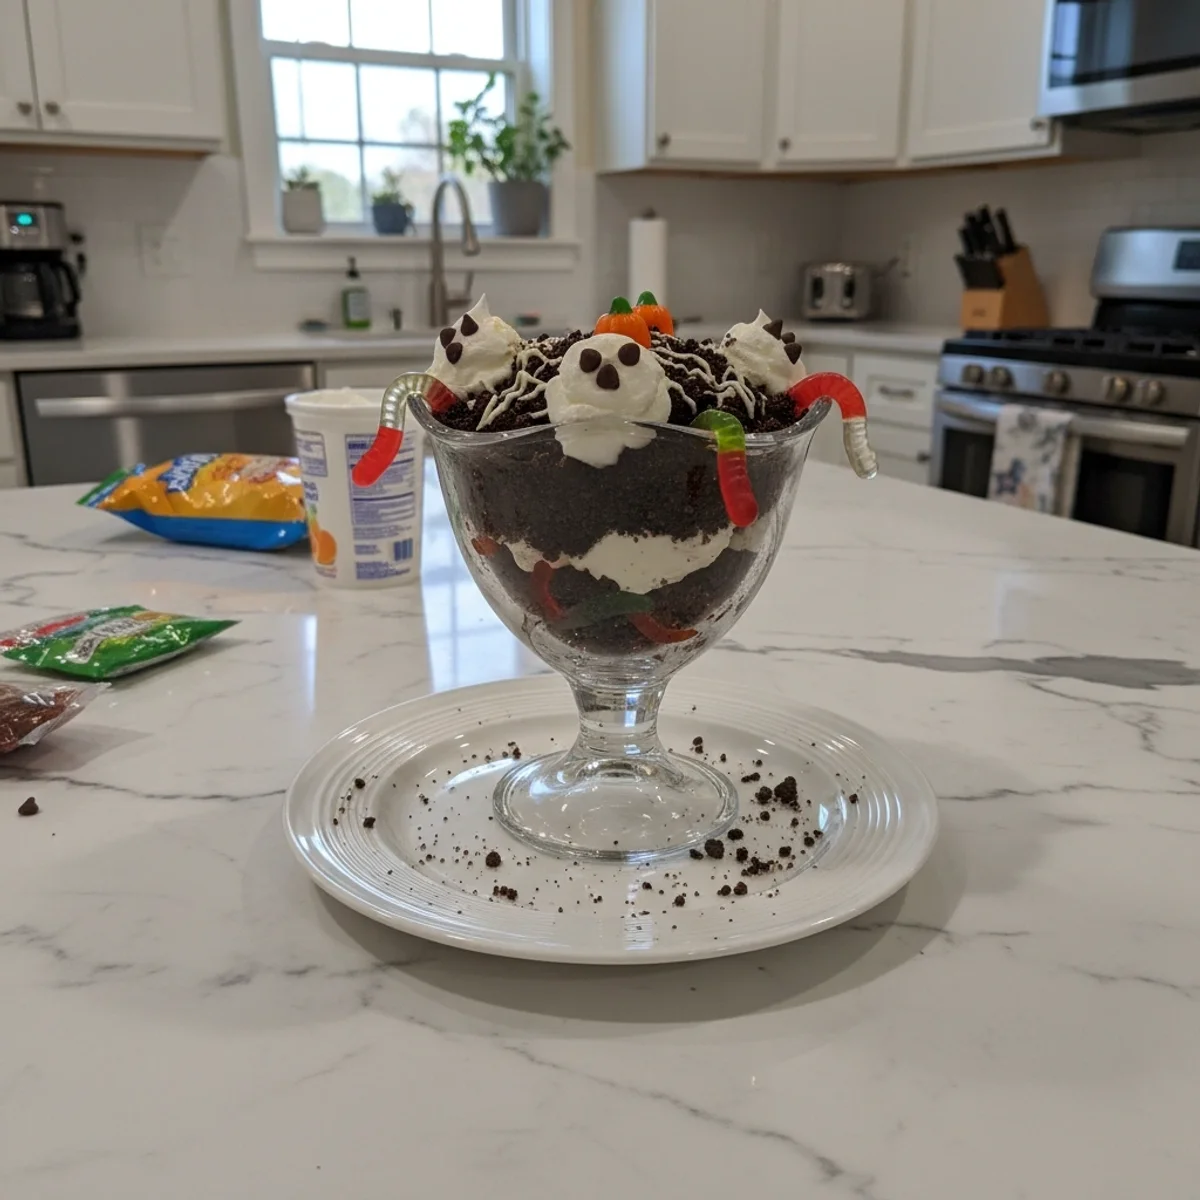
- Chocolate Sandwich Cookies (crushed): These are our 'dirt' layer for the spooky graveyard vibe. I just pop them in a Ziploc and smash 'em with a rolling pin super therapeutic, I swear!
Spooky Decor
- White Melting Wafers or White Chocolate Chips: Essential for our spiderwebs! Melting wafers melt smoother, but white chocolate chips work too, just be careful not to overheat them. I tried using regular chocolate chips for the web once, it was a lumpy disaster, so stick to white!
- Chocolate Frosting (in a tube with a fine tip): This is for the spider bodies. The tube makes it so much easier to get those little dots just right.
- Candy Eyes: Because everything is cuter, and spookier, with eyes!
Instructions
- Prep the 'Dirt' Layer:
- First things first, let's get those chocolate sandwich cookies ready. Grab your favorite brand I usually go for the classic ones. Pop them into a large Ziploc bag, seal it up tight, and then just go to town with a rolling pin or even the bottom of a sturdy mug. Smash 'em until they're fine crumbs, like fresh garden dirt. This is where I always get a little too enthusiastic, honestly, sometimes crumbs fly, but it's all part of the fun, right? You want them fine enough to scoop easily into your serving glasses, creating that perfect graveyard base for our Easy No-Bake Halloween Dessert.
- Whip Up the Pudding:
- Next, grab a big mixing bowl for the chocolate pudding. Pour in your whole milk remember, no skim! and then whisk in the instant chocolate pudding mix. I always start slow, then speed up, making sure there are no lumpy bits hiding at the bottom. Whisk for about two minutes, or until it starts to thicken up nicely. Don’t overmix it, though, I've done that and it gets weirdly thin after a while, which is not what we want for a sturdy dessert. It should be smooth and luscious, smelling wonderfully chocolatey. Pop it in the fridge for a few minutes to let it set up a bit more while you get the next step ready.
- Fold in the Fluff:
- Once your pudding has had a little chill time and is nice and thick, it’s time for the whipped topping. Gently fold it into the chocolate pudding. This isn't a vigorous whisking situation, we're going for light and airy here, so use a spatula and incorporate it with a gentle hand. You want streaks of white and brown at first, then a uniform, light brown, fluffy mixture. It should smell even more inviting now, like a chocolate cloud! This step makes your Easy No-Bake Halloween Dessert extra decadent and light, not too heavy after all those Halloween candies.
- Assemble Your Layers:
- Now for the fun part: layering! Grab your serving glasses or jars. Start with a generous spoonful of your crushed cookie 'dirt' at the bottom of each glass. Then, carefully spoon in a layer of your fluffy chocolate pudding mixture. Repeat with another layer of cookie crumbs, and then finish with another layer of pudding. You want to leave a little space at the top for our spooky spiderweb and decorations. This is where my kitchen usually gets a bit messy, with crumbs and pudding smudges, but hey, that’s just proof of a good time, right?
- Craft the Spiderwebs:
- Time for the star of our Easy No-Bake Halloween Dessert! Melt your white melting wafers or white chocolate chips according to package directions. I usually do this in the microwave in short bursts, stirring often, because I’ve definitely burned chocolate before major oops! Once melted and smooth, transfer it to a small piping bag with a tiny snipped corner or a Ziploc bag. Pipe concentric circles on top of the pudding, starting from the center and working your way out. Then, grab a toothpick and drag it from the center outwards through the circles to create that classic spiderweb effect. Don't worry if it's not perfect, rustic webs are charming!
- Add Your Spooky Friends:
- Almost done! Grab your chocolate frosting in a tube. Pipe a small dot near the edge of your spiderweb this will be the body of your spider. Place two little candy eyes on top of the frosting dot. You can add a few more dots for legs if you’re feeling extra artistic, but honestly, the body and eyes are enough to get the spooky point across! Pop your finished Easy No-Bake Halloween Dessert into the fridge for at least 30 minutes to let everything set and chill. They look so cute and creepy, you’ll be so proud!
Making these Easy No-Bake Halloween Desserts always brings back memories of my mom trying to get us to eat "healthy" Halloween snacks. Bless her heart, but sometimes you just need chocolate! This recipe lets us have all the fun and flavor without the stress. It’s a little slice of kitchen chaos that always ends in smiles, and honestly, that's what cooking is all about for me. The first time my daughter saw the finished spiderwebs, her eyes went wide. That's the magic, isn't it?
Easy No-Bake Halloween Dessert Storage Tips
So, you've got leftover Easy No-Bake Halloween Desserts? Lucky you! These little beauties actually store pretty well in the fridge. Just make sure to cover them tightly with plastic wrap to prevent them from drying out or absorbing any weird fridge smells. I’ve found they hold up best for about 2-3 days. Beyond that, the cookie crumbs start to get a bit soft, and the pudding can lose some of its fresh texture. I microwaved one once, thinking it might warm up nicely, and the pudding separated so don't do that, lol! Best served chilled. If you're prepping them ahead for a party, I'd say make them the day before for optimal freshness and texture. The spiderwebs stay perfectly intact, which is a win!

Ingredient Substitutions for Your Easy No-Bake Halloween Dessert
I'm all about making recipes work with what you've got! If chocolate pudding isn't your jam for this Easy No-Bake Halloween Dessert, vanilla or even butterscotch instant pudding works wonderfully. I tried vanilla once, and it gave it a lighter, creamier taste that was still a hit. For the 'dirt,' if chocolate sandwich cookies aren't available, crushed graham crackers or even chocolate wafer cookies will do the trick just know the flavor will be a little different. I once used some leftover shortbread cookies, and it worked, kinda, but the chocolate ones are definitely superior. And for the spiderwebs, if you don't have white melting wafers, regular white chocolate chips will work, but melt them slowly and carefully to avoid seizing. You can even use dark chocolate for a ghostly white pudding base with dark webs!
Easy No-Bake Halloween Dessert Serving Suggestions
These Easy No-Bake Halloween Desserts are fantastic on their own, but if you want to elevate the spooky factor, I've got a few ideas. Serve them alongside a big bowl of popcorn for a movie night marathon Hocus Pocus, anyone? For drinks, a simple glass of milk or even a homemade 'witches' brew' punch (grape juice and ginger ale, shhh!) would be delightful. I love serving them in clear glass jars or cups so everyone can see those cool layers and the spiderweb design. For a party, arrange them on a tray with some plastic spiders scattered around for extra creepiness. This dish and a classic Halloween flick? Yes please! They're so versatile and fit any spooky mood.
The Fun Backstory of This Easy No-Bake Halloween Dessert
Halloween treats, for me, have always been about the magic and the ease. Growing up, my mom was a fantastic baker, but Halloween was always a bit chaotic. Costumes, trick-or-treating routes, last-minute candy runs baking often got pushed aside. So, no-bake treats became our little tradition. This Easy No-Bake Halloween Dessert reminds me of those simpler times, when we’d gather in the kitchen, not to bake, but to mix and decorate. It's not steeped in centuries of tradition, but it holds a special place in my heart as a modern, fun, and accessible way to bring some festive joy without the stress. It’s about creating new memories, not just recreating old ones, and letting everyone get involved in the fun, no matter their cooking skill!
Honestly, these Easy No-Bake Halloween Desserts are just pure joy in a cup. They're proof that you don't need to spend hours in the kitchen to create something special and memorable. Every time I make them, I get a little sentimental about how much fun we have, and how a simple treat can bring so much happiness. I hope you give them a try for your next spooky gathering. And hey, if your spiderwebs look more like alien sneezes, tell me about it! We're all in this kitchen chaos together. Happy Halloween, my friends!

Frequently Asked Questions About This Easy No-Bake Halloween Dessert
- → Can I make this Easy No-Bake Halloween Dessert ahead of time?
Absolutely! I often make these the day before a party. Just cover them tightly and keep them chilled in the fridge. They're even better when the flavors have had a chance to meld a bit, though the cookies might soften slightly, which I don't mind at all.
- → What if I don't have candy eyes for my Easy No-Bake Halloween Dessert?
No candy eyes? No problem! You can use mini chocolate chips for the eyes, or even pipe tiny dots with the same chocolate frosting you use for the spider bodies. I've used sprinkles before too, just get creative!
- → My spiderweb isn't looking quite right. Any tips for the Easy No-Bake Halloween Dessert design?
Don't worry, it takes a little practice! Make sure your melted white chocolate isn't too hot or too thick. Pipe quickly and evenly. If it's still tricky, just embrace the abstract look spooky blobs are still spooky, right?
- → How long do these Easy No-Bake Halloween Desserts last in the fridge?
I'd say they're at their best for about 2-3 days when stored properly in an airtight container. After that, the cookies can get a bit soggy, and the pudding might lose some of its fresh texture. I definitely wouldn't keep them for longer than 4 days.
- → Can I use sugar-free pudding or whipped topping for this Easy No-Bake Halloween Dessert?
Yes, you can! I've experimented with sugar-free options before, and they work just fine. The texture and flavor might be a tiny bit different, but it still makes a delicious and fun Halloween treat. Feel free to customize to your dietary needs!
Easy No-Bake Halloween Dessert: Spooky Spiderweb Treats
Easy No-Bake Halloween Dessert! Create spooky spiderweb treats in minutes. Simple, quick, and fun for all ages. Enjoy a delicious, no-stress Halloween!
Ingredients
Creamy Base
- 1 (5.9 oz) box instant chocolate pudding mix (large box)
- 3 cups whole milk
- 1 (8 oz) container whipped topping, thawed (like Cool Whip)
Crunchy Elements
- 15-20 chocolate sandwich cookies, crushed (about 1.5 cups)
Spooky Decor
- 1/2 cup white melting wafers or white chocolate chips
- 1 tube chocolate frosting with a fine tip (or small piping bag)
- 12-18 candy eyes
Instructions
-
1Prep the 'Dirt' Layer:First things first, let's get those chocolate sandwich cookies ready. Grab your favorite brand – I usually go for the classic ones. Pop them into a large Ziploc bag, seal it up tight, and then just go to town with a rolling pin or even the bottom of a sturdy mug. Smash 'em until they're fine crumbs, like fresh garden dirt. This is where I always get a little too enthusiastic, honestly, sometimes crumbs fly, but it's all part of the fun, right? You want them fine enough to scoop easily into your serving glasses, creating that perfect graveyard base for our Easy No-Bake Halloween Dessert.
-
2Whip Up the Pudding:Next, grab a big mixing bowl for the chocolate pudding. Pour in your whole milk – remember, no skim! – and then whisk in the instant chocolate pudding mix. I always start slow, then speed up, making sure there are no lumpy bits hiding at the bottom. Whisk for about two minutes, or until it starts to thicken up nicely. Don’t overmix it, though, I've done that and it gets weirdly thin after a while, which is not what we want for a sturdy dessert. It should be smooth and luscious, smelling wonderfully chocolatey. Pop it in the fridge for a few minutes to let it set up a bit more while you get the next step ready.
-
3Fold in the Fluff:Once your pudding has had a little chill time and is nice and thick, it’s time for the whipped topping. Gently fold it into the chocolate pudding. This isn't a vigorous whisking situation, we're going for light and airy here, so use a spatula and incorporate it with a gentle hand. You want streaks of white and brown at first, then a uniform, light brown, fluffy mixture. It should smell even more inviting now, like a chocolate cloud! This step makes your Easy No-Bake Halloween Dessert extra decadent and light, not too heavy after all those Halloween candies.
-
4Assemble Your Layers:Now for the fun part: layering! Grab your serving glasses or jars. Start with a generous spoonful of your crushed cookie 'dirt' at the bottom of each glass. Then, carefully spoon in a layer of your fluffy chocolate pudding mixture. Repeat with another layer of cookie crumbs, and then finish with another layer of pudding. You want to leave a little space at the top for our spooky spiderweb and decorations. This is where my kitchen usually gets a bit messy, with crumbs and pudding smudges, but hey, that’s just proof of a good time, right?
-
5Craft the Spiderwebs:Time for the star of our Easy No-Bake Halloween Dessert! Melt your white melting wafers or white chocolate chips according to package directions. I usually do this in the microwave in short bursts, stirring often, because I’ve definitely burned chocolate before – major oops! Once melted and smooth, transfer it to a small piping bag with a tiny snipped corner or a Ziploc bag. Pipe concentric circles on top of the pudding, starting from the center and working your way out. Then, grab a toothpick and drag it from the center outwards through the circles to create that classic spiderweb effect. Don't worry if it's not perfect, rustic webs are charming!
-
6Add Your Spooky Friends:Almost done! Grab your chocolate frosting in a tube. Pipe a small dot near the edge of your spiderweb – this will be the body of your spider. Place two little candy eyes on top of the frosting dot. You can add a few more dots for legs if you’re feeling extra artistic, but honestly, the body and eyes are enough to get the spooky point across! Pop your finished Easy No-Bake Halloween Dessert into the fridge for at least 30 minutes to let everything set and chill. They look so cute and creepy, you’ll be so proud!
Notes
Don't overmix the pudding, it gets weirdly thin and doesn't set up right, which I learned the hard way.
These keep well in the fridge for about 2-3 days, but the cookies will soften a bit.
I tried using regular chocolate chips for the web once, it was a lumpy disaster, so stick to white melting wafers or white chocolate chips!
Serve in clear glasses for maximum spooky effect, it really shows off those layers!
Equipment
Please check ingredients for potential allergens and consult a health professional if in doubt.
Nutrition Facts
It is important to consider this information as approximate and not to use it as definitive health advice.
Comments
Leave a Comment