

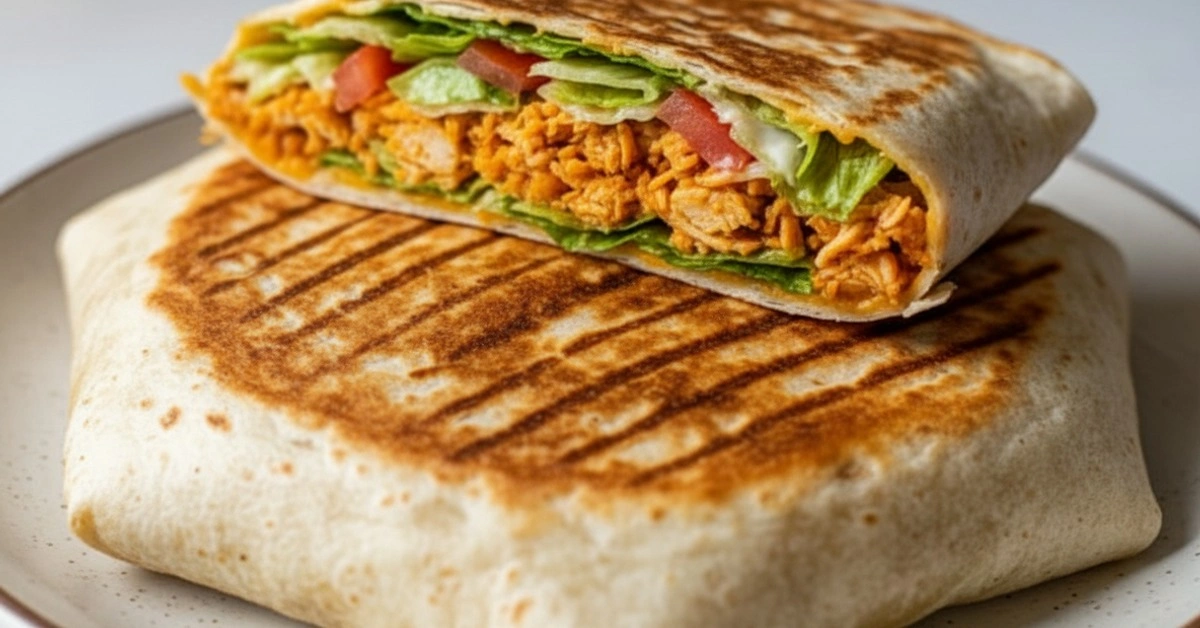
Craving Crunch? Master the Chicken Crunch Wrap – Better Than Takeout!

How to make a Chicken Crunch Wrap with seasoned chicken, melty cheese, and a crispy tostada layer that's better than takeout and ready in minutes.
I still remember the satisfying *crispy* crunch of my first fast-food crunch wrap. That memory sparked my mission to master the perfect Chicken Crunch Wrap, right in my own kitchen.
My initial attempts were... messy, to say the least. Tortillas ripped, fillings exploded, and it looked more like a deconstructed salad explosion than a wrap. I learned quickly that patience and proper layering are key to avoiding a kitchen disaster.
Now, I’ve finally perfected this *golden* Better Than Takeout Crunch Wrap. It’s a truly *delightful* and *nostalgic* treat, bringing carefree *summer* vibes. A comforting family favorite.
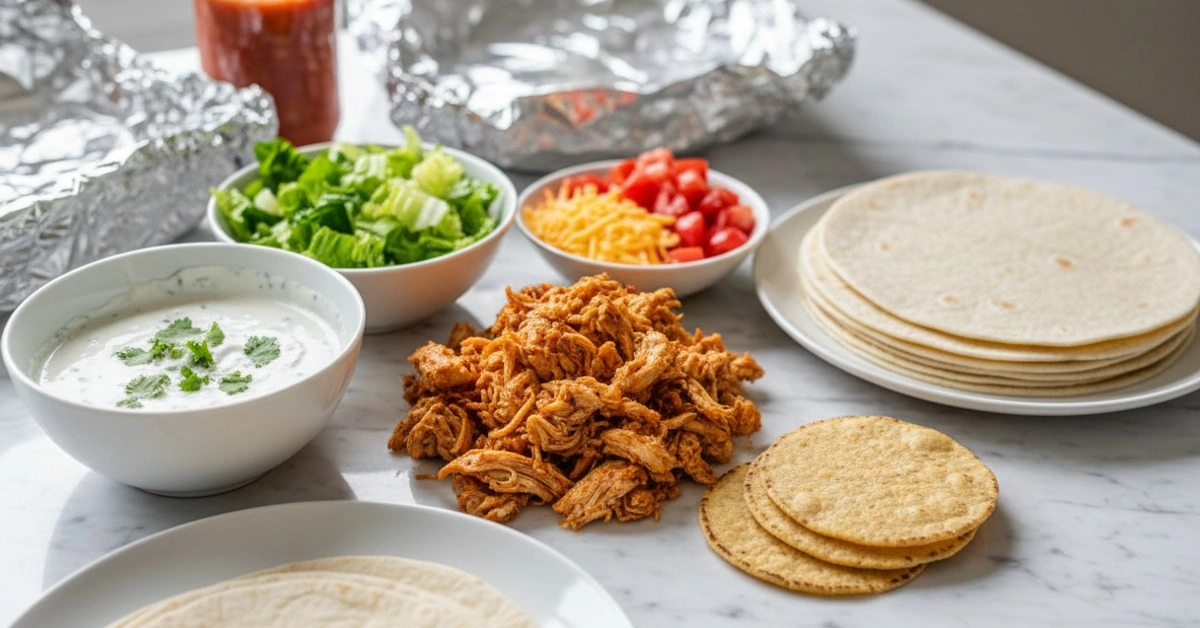
Ingredients for Chicken Crunch Wrap
- 1 ½ lbs boneless, skinless chicken breasts: The star protein for our "Chicken Crunch Wrap". Cook it well and shred for the best texture and flavor absorption.
- 8 large (10-inch) flour tortillas: These are the essential foundation for wrapping all the delicious layers. Look for pliable ones that won't tear easily.
- 4 crispy corn tostadas: This is the secret to the signature "crunch" in every bite. Ensure they are fresh and crisp for maximum impact.
- 2 cups shredded Mexican blend cheese: Provides melty, savory goodness, binding the layers together. Use a good quality blend for optimal flavor and texture.
- ½ cup sour cream: Adds a necessary creamy tang and moisture, balancing the rich flavors. Full-fat sour cream delivers the best mouthfeel.
- 2 tablespoons vegetable oil: Essential for cooking the chicken and getting that perfectly golden-brown, crispy exterior on the finished wrap.
- 1 small yellow onion, finely diced: A foundational flavor builder, adding aromatic depth and a subtle sweetness to the seasoned chicken.
- 3 cloves garlic, minced: Provides pungent, aromatic backbone to the chicken filling. Freshly minced garlic offers superior flavor compared to jarred.
- ½ cup mild salsa: Infuses the chicken with classic Mexican-American flavor and moisture. Choose your favorite brand or a homemade version.
- 2 tablespoons taco seasoning: The key to perfectly seasoned chicken. Use a low-sodium blend if you're sensitive to salt.
- 1 teaspoon kosher salt: Balances and enhances all the flavors in the filling. Adjust to your personal preference after tasting.
- ½ teaspoon black pepper: Adds a subtle warmth and a gentle kick. Freshly ground pepper is always recommended for superior flavor.
- 1 cup shredded iceberg lettuce: Provides a refreshing, crisp texture and a cool counterpoint to the warm filling. Shred it finely for even distribution.
- ½ cup diced Roma tomatoes: Adds a burst of fresh, juicy sweetness and a vibrant color. Choose ripe, firm tomatoes for the best results.
How to Make Chicken Crunch Wrap
- Cook Chicken:
- Heat oil, sauté onion and minced garlic, then cook chicken breasts until no longer pink and cooked through. Shred the cooked chicken using two forks, creating the flavorful base for your Chicken Crunch Wrap.
- Season Fillings:
- In a bowl, combine the shredded chicken with taco seasoning, kosher salt, black pepper, and mild salsa. Stir in half of the shredded Mexican blend cheese until well mixed, ensuring a delicious core for the wrap.
- Prep Tortillas:
- Gently warm your large flour tortillas in a dry skillet or microwave for 15-20 seconds each, making them pliable. This step is crucial for easy folding and preventing tears during assembly of the Chicken Crunch Wrap.
- Layer Wrap:
- On a large tortilla, spread a spoonful of sour cream, then a generous layer of the seasoned chicken mixture. Top with a crispy corn tostada, another sprinkle of cheese, shredded lettuce, and diced tomatoes.
- Seal Wrap:
- Place a smaller tortilla (or a cut piece of a large one) over the center. Carefully fold the edges of the large tortilla inward, overlapping to create a sealed hexagonal shape. Ensure it's snug and secure for cooking.
- Sear Wraps:
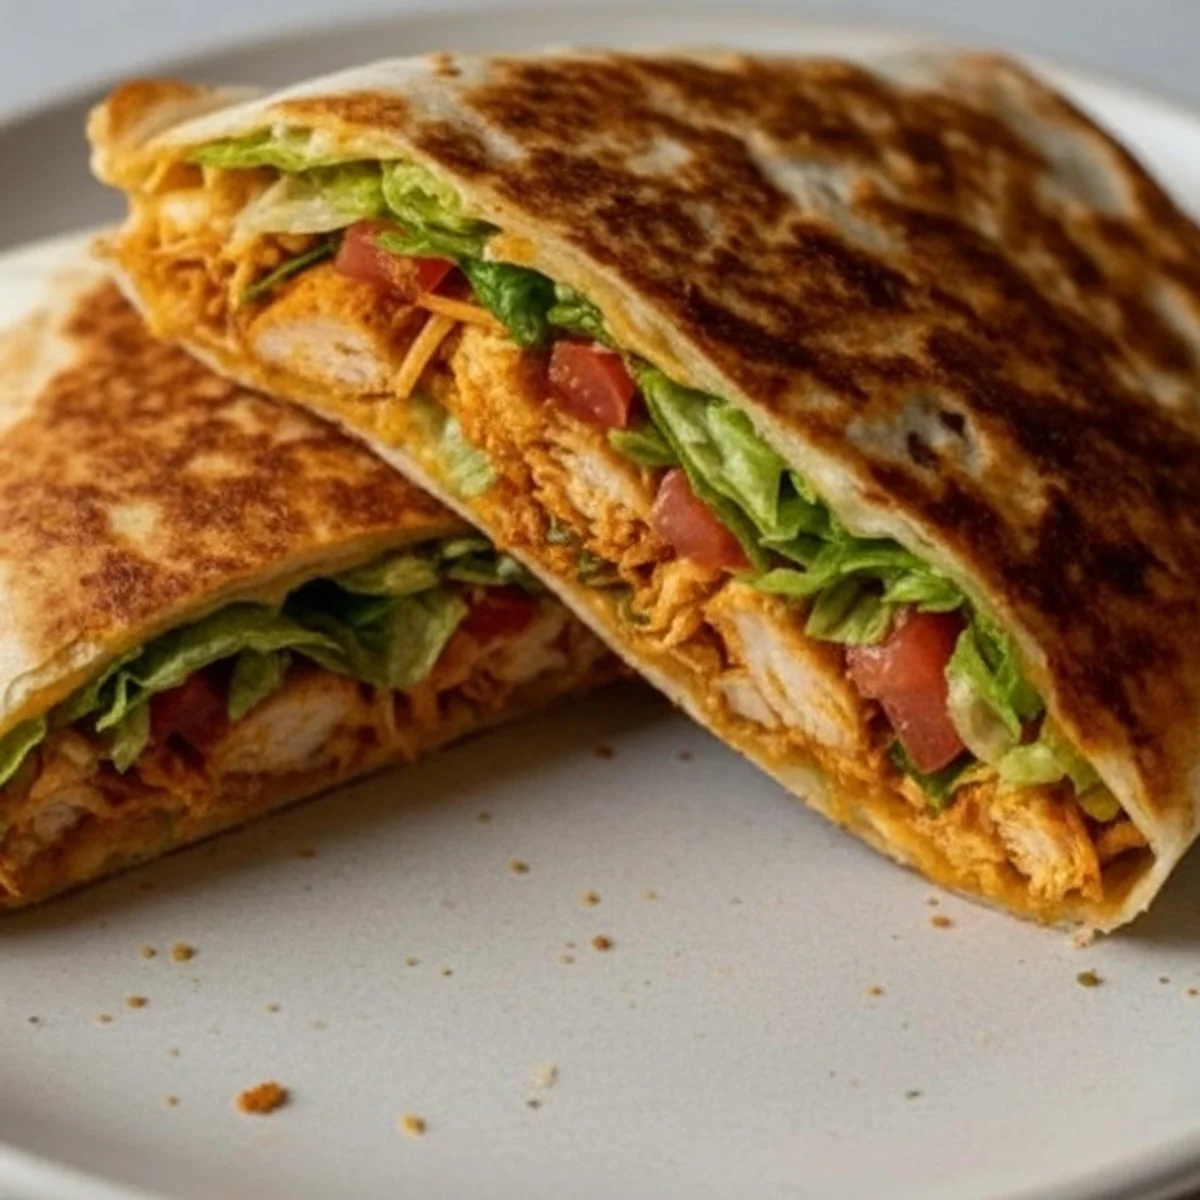
- Heat a little vegetable oil in a skillet over medium heat. Place each folded Chicken Crunch Wrap seam-side down first, cooking for 3-4 minutes per side until golden brown and crispy. The cheese inside will be perfectly melty.
- Slice & Serve:
- Remove your beautifully seared Chicken Crunch Wrap from the skillet. Let it cool for a minute, then slice in half and serve immediately. Enjoy your homemade, better-than-takeout treat while it's warm and crunchy!
There's something so deeply satisfying about hearing that first *crispy* crunch as the *golden* Better Than Takeout Crunch Wrap comes off the skillet. Inevitably, my kitchen counter is a battlefield of shredded lettuce, a rogue piece of cheese, and perhaps a smear of sour cream on my cheek, proof of the joyful chaos of assembly.
Yet, as the incredible *aroma* of seasoned chicken and spices fills the air, a sense of warmth and comfort settles in. For a moment, all the daily chaos melts away, replaced by the simple *joy* of creating something delicious. This is why I cook – for these small, perfect moments of culinary delight and the promise of a shared meal.
How to Store Chicken Crunch Wrap
To store leftover Chicken Crunch Wraps, place them in an airtight container. Refrigerate promptly for up to 3-4 days. Leaving them out too long compromises freshness – don't do what I did and leave them on the counter overnight! Always check for any off smells or sliminess before reheating.
For make-ahead, prep seasoned chicken, cheese, and veggies a day or two ahead. Store components separately in airtight containers. Assemble just before cooking for best crunch. Reheat finished wraps in a dry skillet for a crispy exterior, avoiding the microwave for best results.
 Pin it
What to Serve with Chicken Crunch Wrap
Serve your Better Than Takeout Crunch Wraps immediately, sliced in half to reveal their delicious layers. For a fun, social presentation, arrange them on a colorful platter. Enjoy them warm and crispy straight from the skillet. They pair perfectly with a vibrant side of fresh pico de gallo, a dollop of guacamole, or even a refreshing limeade for a complete meal.
My personal favorite way to serve these is with an extra squeeze of fresh lime juice over the top, alongside a small bowl of spicy salsa verde for dipping. The bright citrus and a little extra kick truly enhance the flavors, making each bite even more satisfying.
 Pin it
Frequently Asked Questions
- → How do I prevent my tortillas from tearing when folding the Better Than Takeout Crunch Wrap?
Always gently warm your large tortillas for 15-20 seconds in a dry skillet or microwave until perfectly pliable. This crucial step makes them flexible and prevents tearing, which I learned the hard way with many ripped wraps.
- → Can I use ground beef or turkey instead of chicken breasts for this crunch wrap?
Yes, absolutely! You can easily substitute ground beef or turkey for the chicken. Cook it thoroughly, drain any excess fat, then season it as directed. It makes a delicious variation, though the texture will be slightly different.
- → Can I freeze assembled Better Than Takeout Crunch Wraps for later enjoyment?
Freezing fully assembled crunch wraps isn't ideal, as the lettuce and tomatoes will become soggy when thawed. However, you can prep the seasoned chicken mixture ahead and freeze it, then assemble fresh when ready to cook.
- → Can I make a vegetarian version of this Better Than Takeout Crunch Wrap recipe?
Yes, you can! Substitute the chicken with seasoned black beans, refried beans, or a plant-based ground crumble. Ensure your taco seasoning is vegetarian. It's a simple and delicious swap for a meat-free meal.
- → How long do leftover Chicken Crunch Wraps stay fresh in the refrigerator?
Leftover Chicken Crunch Wraps will stay fresh in an airtight container in the refrigerator for up to 3-4 days. For best results, reheat them in a dry skillet to regain that crispy exterior, avoiding the microwave.
Craving Crunch? Master the Chicken Crunch Wrap – Better Than Takeout!
How to make a Chicken Crunch Wrap with seasoned chicken, melty cheese, and a crispy tostada layer that's better than takeout and ready in minutes.
Ingredients
Main Components
- 1 ½ lbs boneless, skinless chicken breasts
- 8 large (10-inch) flour tortillas
- 4 crispy corn tostadas
- 2 cups shredded Mexican blend cheese
- ½ cup sour cream
- 2 tablespoons vegetable oil
Flavor Builders & Freshness
- 1 small yellow onion, finely diced
- 3 cloves garlic, minced
- ½ cup mild salsa
- 1 cup shredded iceberg lettuce
- ½ cup diced Roma tomatoes
Seasonings
- 2 tablespoons taco seasoning
- 1 teaspoon kosher salt
- ½ teaspoon black pepper
Instructions
-
1Cook ChickenHeat oil, sauté onion and minced garlic, then cook chicken breasts until no longer pink and cooked through. Shred the cooked chicken using two forks, creating the flavorful base for your Chicken Crunch Wrap.
-
2Season FillingsIn a bowl, combine the shredded chicken with taco seasoning, kosher salt, black pepper, and mild salsa. Stir in half of the shredded Mexican blend cheese until well mixed, ensuring a delicious core for the wrap.
-
3Prep TortillasGently warm your large flour tortillas in a dry skillet or microwave for 15-20 seconds each, making them pliable. This step is crucial for easy folding and preventing tears during assembly of the Chicken Crunch Wrap.
-
4Layer WrapOn a large tortilla, spread a spoonful of sour cream, then a generous layer of the seasoned chicken mixture. Top with a crispy corn tostada, another sprinkle of cheese, shredded lettuce, and diced tomatoes.
-
5Seal WrapPlace a smaller tortilla (or a cut piece of a large one) over the center. Carefully fold the edges of the large tortilla inward, overlapping to create a sealed hexagonal shape. Ensure it's snug and secure for cooking.
-
6Sear WrapsHeat a little vegetable oil in a skillet over medium heat. Place each folded Chicken Crunch Wrap seam-side down first, cooking for 3-4 minutes per side until golden brown and crispy. The cheese inside will be perfectly melty.
-
7Slice & ServeRemove your beautifully seared Chicken Crunch Wrap from the skillet. Let it cool for a minute, then slice in half and serve immediately. Enjoy your homemade, better-than-takeout treat while it's warm and crunchy!
Notes
Gently warm tortillas until pliable to prevent tearing during folding, ensuring a perfect wrap.
Store leftover Chicken Crunch Wraps in an airtight container in the refrigerator for up to 3-4 days.
Easily substitute boneless, skinless chicken with seasoned ground beef or turkey for a delicious alternative.
Serve these crunchy wraps immediately, sliced in half, for the best warm, crispy experience.
Prep seasoned chicken and other fillings ahead, storing components separately, then assemble fresh.
Equipment
Please check ingredients for potential allergens and consult a health professional if in doubt.
Nutrition Facts
It is important to consider this information as approximate and not to use it as definitive health advice.
Comments
Leave a Comment